Hex Commander: Mission 25 - Before the Stone
Arandur finally joins up with Sylvius and Arcaen. Their task is to find Vivric.
In this mission, you will mostly be commanding hero units. The largest challenge is going to be facing the golems (black banner) and wyverns, however, Arandur's new skill will bend the rules of the game.
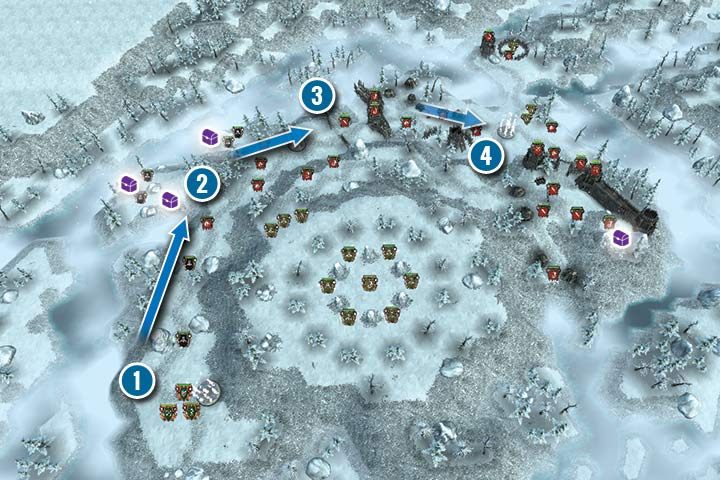
You start in the south-west part of the map (1). The first enemy you will encounter is a frost golem. Every golem possesses a powerful shield, which makes them invulnerable. Although Arandur's attack doesn't deal damage, it removes the shield effect and makes the golems vulnerable to other attacks. Now Sylvius and Arcaena can strike the golem down. Deal with the next golem the same way. In front of you, there's a wyvern; your heroes can slay it with ease. Arandur starts the mission with a powerful potion of regeneration, in addition, he is resistant to magic, so it is easier for him to take punishment from enemies.
You can slightly stray from the path to loot some chests (2). Before you do this, eliminate the approaching wyverns. Arandur can use his skills on allied units to remove negative effects like freeze, or acid DOT effects.
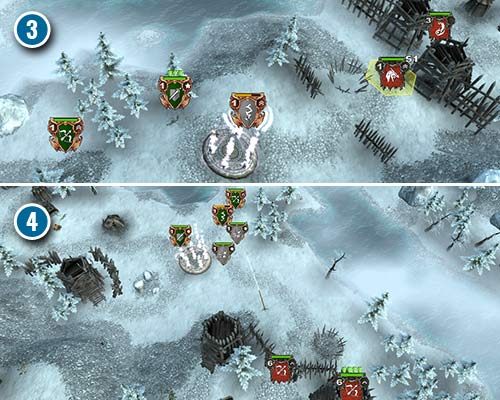
Now it's time to get past the first gate (3). You can easily manage the defending units by trapping an enemy with Sylvius' attack, while the enemy is between the gates. Use the fortifications to your advantage and wait till the enemy comes down from the tower. When that happens, send your heroes to eliminate the ranged units on the towers in the same turn. Now you can place your heroes on the higher ground and repel the wyverns' counterattack.
The last part of the mission is defeating enemies in a small camp to the north from the portal and in the garrison to the south. (1). You can summon additional units, however, we advise you only summon the priestess, and what's more, only when you really have to. At this point, ballistas and a mage join your forces. Siege machines have the goblins on the walls in range, which makes them (the goblins) an easy target. It's enough to position your whole army there and wait until enemies start mindlessly charging at your positions.

- Hex Commander Game Guide
- Hex Commander: Game Guide
- Hex Commander: Elves Campaign
- Hex Commander: Mission 1 - The Beginning
- Hex Commander: Mission 2 - Sapphire Stream
- Hex Commander: Mission 3 - Stream Ambush
- Hex Commander: Mission 4 - Rocky Path
- Hex Commander: Mission 5 - Druid Circle Battle
- Hex Commander: Mission 6 - Defence of Calyril
- Hex Commander: Mission 7 - Four Fang Hideout
- Hex Commander: Mission 8 - Runaways
- Hex Commander: Mission 9 - Blocked Road
- Hex Commander: Mission 10 - Muzzled Gorge
- Hex Commander: Mission 11 - Wyvern Circle Battle
- Hex Commander: Mission 12 - Passing the Village
- Hex Commander: Mission 13 - Crossing the Blockade
- Hex Commander: Mission 14 - Unexpected Strike
- Hex Commander: Mission 15 - Persistence
- Hex Commander: Mission 16 - Mountain Hideout
- Hex Commander: Mission 17 - Lighting Strikes Twice
- Hex Commander: Mission 18 - Elunore Infection
- Hex Commander: Mission 19 - Elunore Siege
- Hex Commander: Mission 20 - Scorched Chasm
- Hex Commander: Mission 21 - Chasm Ambush
- Hex Commander: Mission 22 - Safety Line
- Hex Commander: Mission 23 - Hide and Seek
- Hex Commander: Mission 24 - Grasped
- Hex Commander: Mission 25 - Before the Stone
- Hex Commander: Mission 26 - Circle of Ice
- Hex Commander: Side mission
- Hex Commander: Elves Campaign
- Hex Commander: Game Guide
You are not permitted to copy any image, text or info from this page. This site is not associated with and/or endorsed by the developers and the publishers. All logos and images are copyrighted by their respective owners.
Copyright © 2000 - 2026 Webedia Polska SA for gamepressure.com, unofficial game guides, walkthroughs, secrets, game tips, maps & strategies for top games.