Hex Commander: Mission 21 - Elvish Outpost
The next few missions take place in the western part of the empire. It is time to deal with the Elves! However, the first skirmish won't be easy because you are forced to rely on wits and strength of your hero.

In this mission, Percival is your only unit. You should strengthen him beforehand with Regeneration and Personal Training abilities and increase a number of usable scrolls and potions (casting 3 in one turn will be very useful here). You can't use a teleport here which means that you have to rely only on your hero. You can use some Shield scrolls for Ballistae and the Healer, Raise Dead (to get more units), Rage or Lightning (to kill your enemies fast).
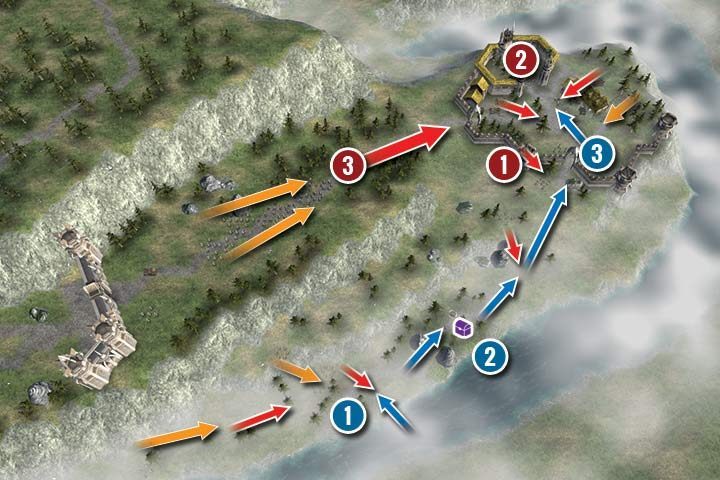
You start the mission in the south part of the map (1). The blue arrows indicate the direction that you have to follow. First, you should deal with two Archers units. One is right next to the river and the second is coming from the east (the red arrows). After that you can go towards the chest and an unknown unit (2). A Healer joins you - she is very vulnerable to attacks and can only heal other units. You also get 3 Mind Control scrolls that you need to complete this mission. Keep the Healer in the back and check your enemy's movement range. All Elf units can move in forests as if they were regular hexes so keep that in mind. A few moments later you will be approached by another Archers. Remember to use Charge and deal a lot of damage. Use the Healer if your hero lost too much health. More Elf units await in the eastern gate (3) - two Archers in the gate and one in the tower (1). Lightning is the best solution to deal with the enemy in the tower but you can also decide to ignore him for now and move forward. However, remember to leave the Healer behind and outside of the Archer's reach.
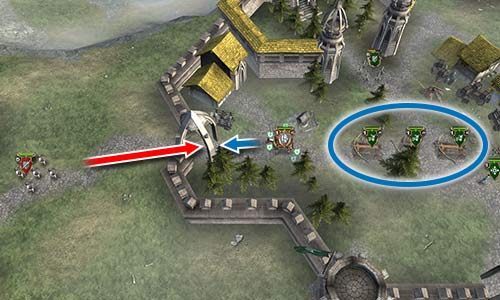
Now, it is time for the most difficult part of the mission. There are three Ballistae and two Elven Infantry squads (2) in the castle located in front of the inner fort. Wait for their move and try to capture all Ballistae in one turn (an increased reach and a greater number of casted scrolls per turn will be useful here). If you don't have these upgrades then you should wait for Ballistae to go in different directions so they won't be in each other's reach. After that you can start capturing them one after another and move them in a such way that they wouldn't be able to destroy each other. A Ballista can't move and shoot in the same turn. Use the Ballistae to clear out the castle from enemy units. Don't forget to bring the Healer.

You now have to face a garrison approaching the castle from the west (3, the big arrow). Place your Ballistae in the center of the castle so they can attack the incoming units that are moving towards the west gate. The hero should be placed in front of the gate - the enemies want to reach the Ballistae but they are stopped the hero. Thanks to that you will be able to deal with all Elf units.
Playing the mission on a higher difficulty (orange markings on the map) means that you have to face more units in the starting forest and in the castle. The returning garrison also gets a few new units. Defeat all enemy Archers before you approach the Healer. Then, use Raise Dead scroll in the castle to distract the enemies. The final group of foes has even more units. Use Rage and Raise Dead scrolls to increase your chances. You should also cast Shield on Percival to help him survive. Securing both entrances is important. Thanks to the Ballistae you get enough fire power to defeat enemies one after another.
- Hex Commander Game Guide
- Hex Commander: Game Guide
- Hex Commander: Human Campaign
- Hex Commander: Mission 1 - Troubling news
- Hex Commander: Mission 2 - Ice Horn
- Hex Commander: Mission 3 - The siege
- Hex Commander: Mission 4 - Tower of Ezerath
- Hex Commander: Mission 5 - The Sun Gate
- Hex Commander: Mission 6 - Escape
- Hex Commander: Mission 7 - Audin Plain
- Hex Commander: Mission 8 - Valendorf
- Hex Commander: Mission 9 - The Hayton Fortress
- Hex Commander: Mission 10 - Frozen Hill
- Hex Commander: Mission 11 - Darkwood
- Hex Commander: Mission 12 - Ice Horn Siege
- Hex Commander: Mission 13 - Tir Assin
- Hex Commander: Mission 14 - Enalone
- Hex Commander: Mission 15 - Hayton Siege
- Hex Commander: Mission 16 - Rauenborn Offensive
- Hex Commander: Mission 17 - Eastern Offensive
- Hex Commander: Mission 18 - Gor Zubul
- Hex Commander: Mission 19 - Kerdan
- Hex Commander: Mission 20 - Kerrash Hill
- Hex Commander: Mission 21 - Elvish Outpost
- Hex Commander: Mission 22 - Alvin's Gate
- Hex Commander: Mission 23 - Counter Strike
- Hex Commander: Mission 24 - Iron Fist
- Hex Commander: Mission 25 - Bazar Dun
- Hex Commander: Mission 26 - Kazad Dir
- Hex Commander: Mission 27 - Dar-Dar Fortress
- Hex Commander: Mission 28 - Towers of Ara
- Hex Commander: Mission 29 - Tower of Light
- Hex Commander: Mission 30 - Dragon's Lair
- Hex Commander: Human Campaign
- Hex Commander: Game Guide
You are not permitted to copy any image, text or info from this page. This site is not associated with and/or endorsed by the developers and the publishers. All logos and images are copyrighted by their respective owners.
Copyright © 2000 - 2025 Webedia Polska SA for gamepressure.com, unofficial game guides, walkthroughs, secrets, game tips, maps & strategies for top games.
