Hellblade 2: Freyslaug Chapter 2
In the second chapter of Hellblade 2 you will come across more clues related to the danger circling over the islanders. On this page we will provide you with a detailed description of the passage of the stage along with the most important elements and finds.
The second chapter of Senua's Saga Hellblade II begins with a visit to an abandoned village ruined by mysterious invaders. In this part of the story, Senua will also join forces with a mysterious stranger. On this page, you will find a detailed walkthrough, puzzle solutions, and interesting places worth checking out.
- Reaching the village
- Gate puzzle
- How to use a mirror during combat?
- What are green trees?
- Draugr ritual
- What are the stone faces?
Reaching the village

- The second chapter opens with the protagonist leading the captured Thorgestr. Head towards the settlement visible on the horizon. Before reaching it, turn right for a moment and look into the farm surrounded by a small fence. In the depths of the enclosed space, you will find a Lorestangir.

- Upon reaching the gates of the settlement, a brief dialogue will start between the characters, as a result of which Senua will continue her journey alone. Go through the hole in the palisade and enter the devastated village.
Gate puzzle

- Head deep into the village, going around barricades and blocked passages, passing through the huts. At some point, your path will be blocked by a magical gate guarding the entrance to the bridge. To open it, you will need to find 3 parts of the symbol near it.

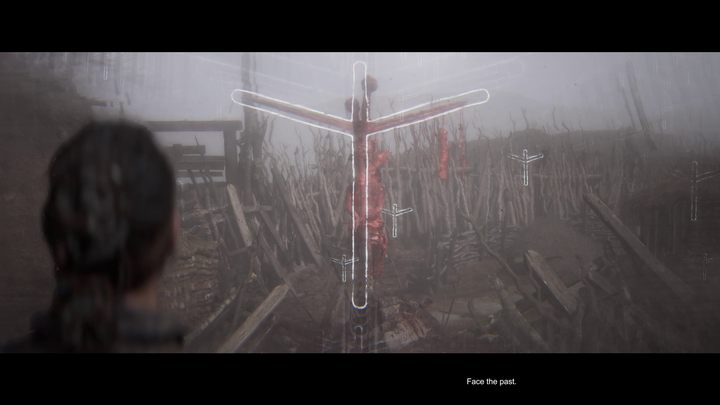
- You can find the first, middle part by going back a bit along the main road. The corpses lying on the barricade (between two huts) will form a blood-red symbol. Position yourselves at the right angle and use focus to activate the clue.

- The second symbol can be found in the cottage to the left of the gate. Go around the building and enter through the hole in the back wall. Use the ladder to climb onto the wooden structure, then look outside towards the huts on the other side of the village. The elements painted in red will form a symbol resembling the letter "K".

- The last symbol can be found behind the houses on the other side of the main street. You will get there by going through the open house. Then go through the next building to reach the elevation. Follow the path until you return to the previously mentioned huts. By looking at the red elements, you activate the last element, thus completing the entire symbol.
How to use a mirror during combat?

- Return to the gate and unlock the seal. This action activates a retrospection, during which Senua will return in memories to her home village. Enter the hut where you will find the main character's silver mirror (use the interaction button while standing next to the table). The scenenery will suddenly change and you will stand opposite spectral warriors covered with a scarlet, crystal shield.

- Fighting them under normal conditions is ineffective, however, the mirror you found here will come in handy. The object attached to the heroine's belt will gradually charge a special bar visible on the edge of the mirror. Once filled, it will allow you to activate time slowdown (E or RT button), which will make the fight much easier. The mirror's power will remove the shield on the red enemies, allowing you to defeat them.
- The game informs you that you can slow the time down by a subtle sound effect and a white glow coming from the rune emitting from the mirror. The power activation bar will fill up over time on its own, but you can speed up this process by effectively attacking opponents and performing perfect parries.

- After defeating the crystal enemies, Senua will briefly return to memories of the past, after which you will get back into the present. Cross the bridge dividing the two parts of the settlement.
What are green trees?

- Go through the hole in the long building to get to the central part of the village. Before heading up the hill, turn left and enter a small square with an observation tower. To its left, there is a passage under the barricade, behind which you will find another Lorestangir.

- Continuing further along the main path, you will come across a lit torch at the end of the village. Enter the ruined hut to the right of the torch. Inside you will find a small, greenish tree. These plants are another type of collectibles. For finding all of them, you will be rewarded with a special achievement, as well as bonus stories you can listen to in the main menu. To activate the tree, look at the plant and then hold down the focus button.
Draugr ritual

- Leave the village by following the path leading to the hill. Your journey will be interrupted at some point by Draugrs - beasts that sacrifice humans. After a short break, head towards the path circling the monster camp.

- Follow the path, which will lead you to the imprisoned stranger. About halfway there, however, you will come across a ladder on the left side of the road. Climb it, and a bit further you will come across another Lorestangir. After activating the collectible, you can continue the journey.

- Upon reaching the tied-up man, Senua will try to free him. However, these actions will attract the attention of the Draugr, which will start a longer fight. During it, you will fight with the next monsters. Be especially careful when fighting a fire-breathing Draugr. His fiery breath is hard to avoid and can easily kill you. When you notice that your opponent is reaching for a flammable liquid, dodge to the left - this should get you out of the range of the flames.
If any type of enemy is causing you particular problems, a good idea might be to save the mirror's power and activate it during the fight with this particular enemy.

- After defeating the Draugrs, you will watch a dynamic escape sequence of the heroine and the stranger. The newly met man will introduce himself as Fargrimr. He tells the heroine about the situation on the island and about the problems caused by the appearance of the Giants.
What are the stone faces?

- As you descend the hill with Fargrimr, stop in front of the destroyed bridge. Turn left. You will find a stone face there. By focusing on it, you will unlock a secret passage, behind which you will find another tree collectible. From now on, every subsequent collectible of this type will be hidden behind stone faces.

- As you go further towards the village, look for a fork marked with a thick stick stuck in a pile of stones. Taking the path on the left, you will come across another Lorestangir. After activating the next rune, return to Fargrimr, with whom you will return to the village. Before entering it again, you will meet with the tied-up Thorgestr - this ends the second chapter.
You are not permitted to copy any image, text or info from this page. This site is not associated with and/or endorsed by the developers and the publishers. All logos and images are copyrighted by their respective owners.
Copyright © 2000 - 2025 Webedia Polska SA for gamepressure.com, unofficial game guides, walkthroughs, secrets, game tips, maps & strategies for top games.
