Control The Foundation: Hidden places - secrets
On this page of our game guide you can find information about the location of hidden places and secret areas in the Control - The Foundation DLC. For finding all 10 secret locations in The Foundation Caves you will earn the Niche Position trophy. In addition, you will receive 1 skill point for discovering each hidden location.
- Hidden location 1 - Crossroads
- Hidden location 2 - Warehouse
- Hidden locations 3, 4 - Collapsed Department
- Hidden location 5 - Collapsed Passage
- Hidden location 6 - Transit Access
- Hidden location 7 - Cave System
- Hidden location 8 - Astral Collision
- Hidden location 9 - Astral Collision
- Hidden location 10 - Warehouse
Hidden location 1 - Crossroads

You need to take a look at the northern part of the Crossroads location. At this point, Jesse can reach the lower ledges adjacent to the chasm.


Head west and reach more ledges by jumping and flying. Your destination shown in the pictures above is the dark area at the very end. Destroy the boards to get inside and mark this hidden location as visited. You'll find a document and a loot chest. Watch out! The chest is a trap - a monster will jump out of it.
Hidden location 2 - Warehouse

You can try to find the secret area after unlocking Level 6 - Upper Warehouse in the Warehouse location. This occurs during The Nail main mission.

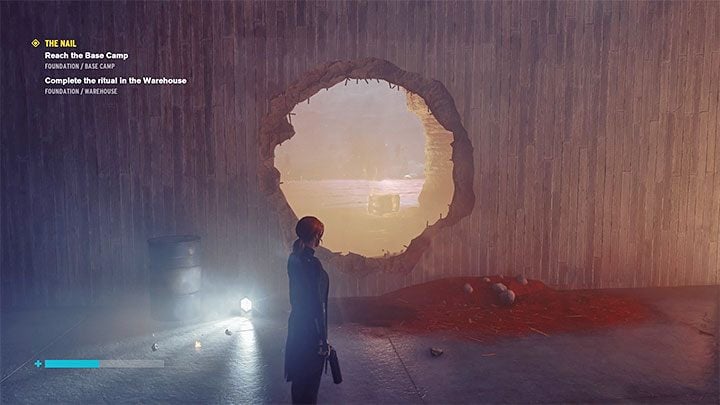
Once you reach floor 6, take your time to reach the monolith, where you have to perform a ritual. Stay in the location with an elevator shaft and search for the weakened wall shown in the picture that can be destroyed.

In a secret area you will find a new control point - the Upper Warehouse.
Hidden locations 3, 4 - Collapsed Department


Two hidden locations can be found in the Data Entry and Filing room visited in the initial section of the Collapsed Department. Once you get there, you have to deal with a group of opponents first.


After the battle, explore and examine the offices. In two of them, you can demolish walls and discover hidden locations. In addition, in one of these rooms there is another wall that can be destroyed. A cat figurine is hidden there - you can find out more about this on the Maneki-neko Statues page of our guide.
Hidden location 5 - Collapsed Passage

The secret area can be easily found during your first journey through the Collapsed Passage. Jesse will reach the locked gate shown in the picture above. After a failed attempt of opening it, you have to select the right path, that is, through the Transit Control.

You'll get to the little elevator. Activate it, but jump off it immediately after it moves to the upper floor.

The hidden location is the lower part of the shaft shown in the picture, which was originally covered by the elevator. Jump on it in order to unlock another secret location.
Hidden location 6 - Transit Access


You need to look around near the Transit Access location shown in the pictures - it's behind the corridor with elevators. One of them can be called.

Once the elevator reaches that floor, a single monster will emerge from it. The game will already unlock the hidden location at this point, but after defeating the monster, it is worth taking an extra look at the elevator. You'll find a loot chest and a secret document.
Hidden location 7 - Cave System


You can only get to the secret location once you unlock the Shatter power as part of the Nail main mission. Jesse must be able to reach the upper areas of the Cave System. The heroine has to go directly towards the bridge shown in picture 1.

Turn left and enter the hidden location where you will find a loot chest.
Hidden location 8 - Astral Collision


The secret location is in the Astral Collision area. By that we mean the astral plane which the heroine visits for the first time during The Nail main task. After unlocking some control points, Jesse can also freely return to the astral realm later in the game.
When exploring the initial areas of the astral plane, look for a place indicated in the picture that you can jump to (picture 1) or reach by flying and using levitate (picture 2).

The hidden area is a section of the toilet. The game will mark this place as explored no matter how you got here. You'll also find a loot chest.
Hidden location 9 - Astral Collision

Use fast travel to move to the control point in the Astral Tower PE in the location of Astral Collision. Stay where the control point is and take an interest in the small tower shown in the picture.

Get to the top of the tower by using levitation. In addition to discovering a hidden location, you will also find a TV with a video-recording collectible.
Hidden location 10 - Warehouse

Reach the Warehouse location and enter the tower available in the area. Use the elevator to reach Level 3 - Tunnel Access. Step out of the elevator and climb up the scaffolding into the hole in the tower wall shown in the picture.

As part of the Nail main mission, Jesse's had to glide towards the yellow ledge visible in the front. Do not do this, but instead turn right and start flying around the tower. You have to reach the lower hole that we marked in the picture.

Fly through the gap to find yourself on the new floor of the tower, which was not available while traveling by the elevator. In addition to unlocking the hidden location, you will also find a document collectible.
You are not permitted to copy any image, text or info from this page. This site is not associated with and/or endorsed by the 505 Games or Remedy Entertainment. All logos and images are copyrighted by their respective owners.
Copyright © 2000 - 2025 Webedia Polska SA for gamepressure.com, unofficial game guides, walkthroughs, secrets, game tips, maps & strategies for top games.
