Tank Mechanic Simulator: Interface in Tank Mechanic Simulator
Last update:
This chapter will help you familiarize yourself with the interface in Tank Mechanic Simulator. This will be very helpful during the first few hours spent in the game. You have to control the work in the workshop and much more - this section will help you with your first steps as a tank mechanic.
The basic interface
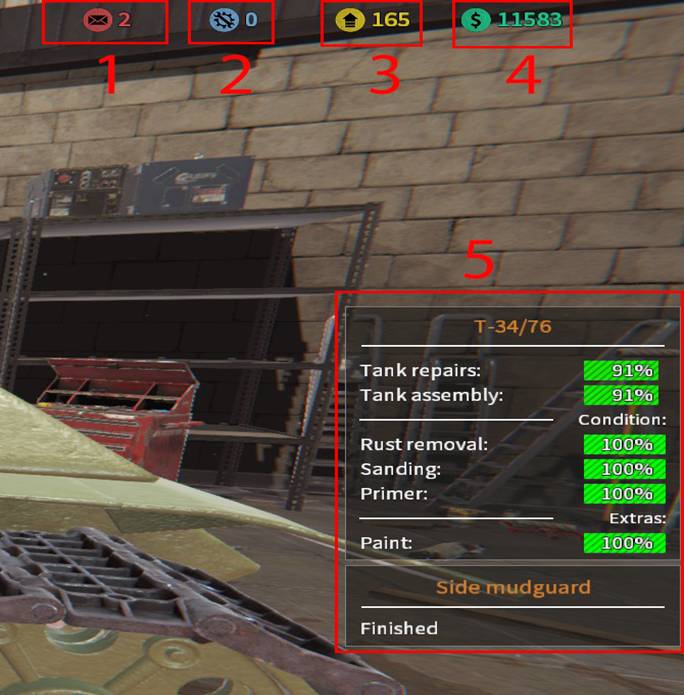
During the game, there are only a few icons displayed in the upper-right corner of the screen. They show the number of messages and orders in the mailbox (1), parts that have to be crafted (2), the number of available reputation points (3), and the amount of cash (4).
The window (5) appears when you look at the tank you are working on right now - starting from the top of the window, you have tank model, level of repair, level of the tank assembly, level of rust removed and level of sanding, percentage of coverage with primer paint and regular paint. Below you will find details of the highlighted tank part (name and repair status).

Radial menu
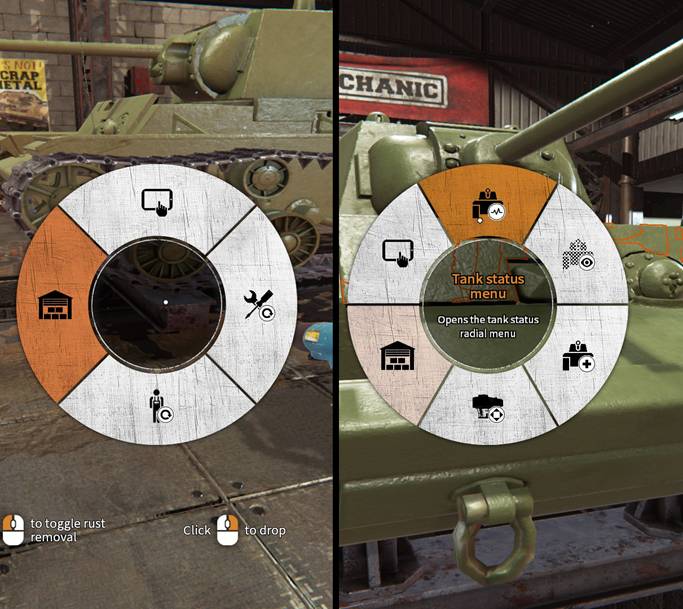
The radial menu is for performing basic operations in the workshop - get used to this menu, you will see it a lot. In this menu, you can receive new orders, use notes, or reset your positions and tools.
When you look at the serviced tank and open the radial menu, you will be able to move the vehicle to the workshop/museum/yard. You can also choose diagnostic options (display the status of all parts of the tank), parts assembly and disassembly mode, the option to take a seat in the tank.

- Tank Mechanic Simulator Guide
- Tank Mechanic Simulator: Game Guide
- Tank Mechanic Simulator: Basics
- Tank Mechanic Simulator: Starting tips for Tank Mechanic Simulator
- Tank Mechanic Simulator: Interface in Tank Mechanic Simulator
- Tank Mechanic Simulator: Skills in Tank Mechanic Simulator
- Tank Mechanic Simulator: Repairing tanks in Tank Mechanic Simulator
- Tank Mechanic Simulator: Excavating tanks in Tank Mechanic Simulator
- Tank Mechanic Simulator: Managing the museum in Tank Mechanic Simulator
- Tank Mechanic Simulator: Loans in Tank Mechanic Simulator
- Tank Mechanic Simulator: Basics
- Tank Mechanic Simulator: Game Guide
You are not permitted to copy any image, text or info from this page. This site is not associated with and/or endorsed by the developers and the publishers. All logos and images are copyrighted by their respective owners.
Copyright © 2000 - 2025 Webedia Polska SA for gamepressure.com, unofficial game guides, walkthroughs, secrets, game tips, maps & strategies for top games.
