Black Mirror: Riddle with runes in host's office
You are in the walkway that goes above the hall. Walk around it partially by heading right until you reach the door that leads to the host's office (on the right of the antlers on the wall; you will pass by Edward's portrait).
Opening the office of the host
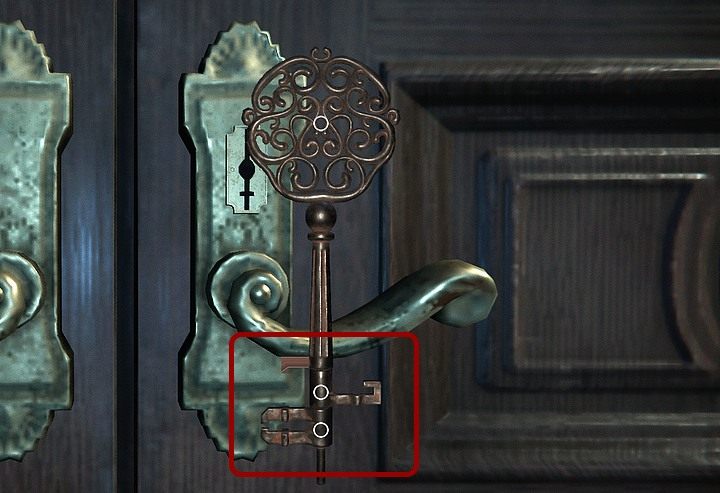
Take a closer look at its unusual lock - in theory, you can try to open it with a lock pick, however, you will learn that this won't be that easy this time. At first, using the key won't work either - you have to zoom in and align its moving indents with the lock.

Turn the single moving indent (second from above or third from below) in a such way that it would face in the opposite direction to the upper one that is short and doesn't move. The two lower indents, that turn together, should face the same direction as the upper, shortest, indent.

Open the door and approach the desk (in the middle of it you can find an interactive point) and read carefully what you will find there. The upper shelf on the right has nothing interesting besides a fragment of a photo. Check the shelf on the left. The upper one isn't interactive but the one in the middle has Edward's correspondence regarding household issues (David will place two sheets of paper on the desk). The lower drawer has a double bottom (click on the interactive point in its left corner - David will pick it up). Take the sheets of paper from it - David puts one on the desk next to the previous two, the second sheet is a note written by father. One of its sides mentions a shrine and family chronicles and the other side has a drawing that serves as a clue. The drawing depicts three rings - the outer is marked with number 2, the middle one with 5 and the inner ring has number 1. Lastly, read the notes on the desk (each one of them has two interactive points; the white one mentions a disappearance of a girl).
Opening the stash in the shelf

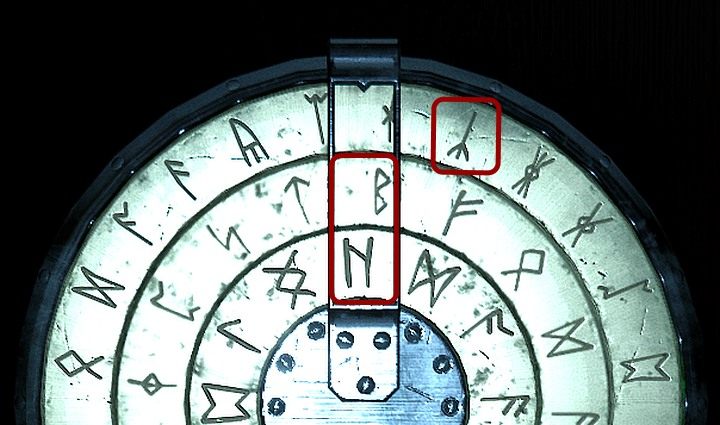
Approach the bookshelf located on the right of the desk. There is a bright shield located in its center (click on it twice) that consist of three rings - the clue that David found is for this puzzle. Zoom in on the shield and move the camera to the left as far as possible - you can see round gold plaquettes on the left side of the bookshelf (they are next to each of the shelf). Follow the clue - move the camera with W and S keys and check the symbol next to the first (upper) shelf. Then, check the second shelf and the last, fifth, one (on the very bottom). Go back to the shield with rings and move them - rotate the wyrd rune on the upper ring so that rune is now in the middle (the rune next to the second shelf), berkano in the middle ring (the fifth shelf) and hagalz in the smallest ring (the first shelf) - just like in the picture. This can also be achieved by following the numbers on the note (2-5-1). This activates a mechanism and reveals a model of a castle. Look closer at the place in the bottom of the model - you can see that it's missing a tower. Place the item there.
You are not permitted to copy any image, text or info from this page. This site is not associated with and/or endorsed by the developers and the publishers. All logos and images are copyrighted by their respective owners.
Copyright © 2000 - 2025 Webedia Polska SA for gamepressure.com, unofficial game guides, walkthroughs, secrets, game tips, maps & strategies for top games.
