Liberation of Leipzig | Map analysis

Map name: Liberation of Leipzig
Location: Leipzig, Germany
Game mode: Conquest: Assault Lines
Map description: A typical urban map, generally flat, with a few wide streets and lots of hiding places and small passages, which may be used by the infantry, especially Engineers preparing for launching an anti-armor rocket at enemy battlewalkers or Goliath. In the central part of the battlefield, we could see some interesting vantage points for snipers, however this type of fights is a rare thing right there. The map is divided by a frozen river, with two huge bridges right above. Teams are struggling almost everywhere in the city, but I must say that in fights near the river's bed, snipers and mechanics aiming at enemy vehicles located on the other side of the ice take participation nearly every time. The majority of flags is situated next to main roads, so soldiers defending them are able to see the enemy from a distance.
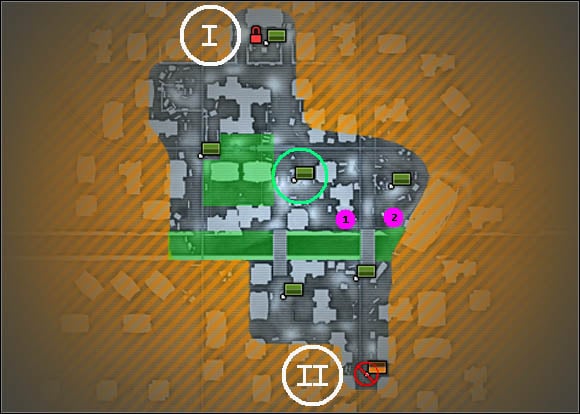
Analysis: Green circle in the middle of the map marks a significantly important flag, because it is possible to perform strikes on other spawns from that point. That is why fights in this region are more embittered than anywhere else. Green polygon in the western part of the map is a terrain dominated by infantry, which not only use this region as a kind of small battlefield, but also as a passage between the central and western flags. The river's bed, marked with green, is a great route for Hachimotos. That is quite strange, but players rarely look for enemies in the bed, so crews of these PAC vehicles can feel relatively safe. Places [1] and [2] are vantage points for both snipers and mechanics. Unfortunately, there are no similar (and as good as) points on the other, southern side of the river. Teams have their main bases in [I] and [II]. Battlewalkers, Goliath and Hachimotos respawning there will greatly assist soldiers in achieving their goals.
Strategy for EU: There are two PAC flags on our way. It is important to break through the first defence line, as it will allow our infantry to get to the northern part of the map and take some outposts. This will weaken the PAC army, because from now EU forces will be able to respawn in many different places and attack enemy soldiers from many directions at once. Goliath should take care of that first defence line, but it must be assisted by the battlewalker and some infantry. Be aware of the fact that fights at the eastern bridge are more embittered. However, these can be stopped by taking the eastern flag. If the enemy will appear to be persistent, expect a hard struggle at the central control point. Sending a Goliath in there will surely increase the chance of taking it, but don't think this will do the job in 100%. The team has to assist the vehicle, just as usual. We may talk about a great success if the team will be able to take control - even unstable - over some of the spawns in the central part of the map and to defend southern flags effectively at the same time.
Strategy for PAC: It is always a tough nut to crack for the PAC. First of all, somebody has to take the battlewalker and get it to the south in order to defend flags placed in there. It is a very difficult task, but persistent defence will surely retard the moment when EU manages to cross the river. There is always a risk that some single soldiers will get unseen to the northern part of the map, but I think that a Hachimoto patrolling the area would be enough to take care of this problem. When the whole enemy army gets to the north, prepare for the worst. Hope God will be merciful for PAC, because the enemy will not. EU forces won't stop attacking until they take control over the whole city. However, Assaults' (because they heal) and Engineers' (because they blow up the Goliath) teamwork should do the trick and stop the enemy. Mechanics can also deploy mines, but it is highly dangerous; you never know when you'll take a bullet to the butt, head or something else.
You are not permitted to copy any image, text or info from this page. This site is not associated with and/or endorsed by the Electronic Arts or Digital Illusions. All logos and images are copyrighted by their respective owners.
Copyright © 2000 - 2025 Webedia Polska SA for gamepressure.com, unofficial game guides, walkthroughs, secrets, game tips, maps & strategies for top games.
