Battlefield 2142 Northern Strike: Bridge at Remagen | Map analysis

Map name: Bridge at Remagen
Location: Remagen, Germany
Game mode: Conquest: Assault Lines
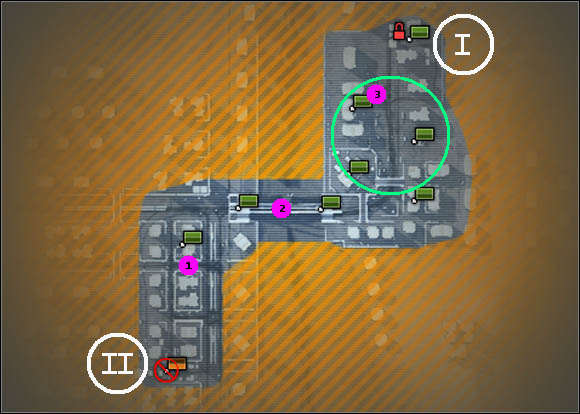
Map description: We are fighting in the city called Remagen, placed over the Rhine river. Although the terrain is urbanised, there are some open areas, ideal for snipers and engineers armed with rocket launchers. As we can see on the map above, the battlefield is divided into two parts by the frozen river. It is possible to get on the ice from the damaged parts of the bridge located in the central part of the map. Roads here are quite wide (except that bridge, where two Hachimotos would have some problems with passing), so travelling by heavy machinery doesn't cause troubles. The terrain is almost entirely flat. The infantry may be a bit angry, because of lack of vehicles, which makes it march all the time. Some flags are quite difficult to access with heavy machinery; driver has to focus on manoeuvring instead of fighting enemies.
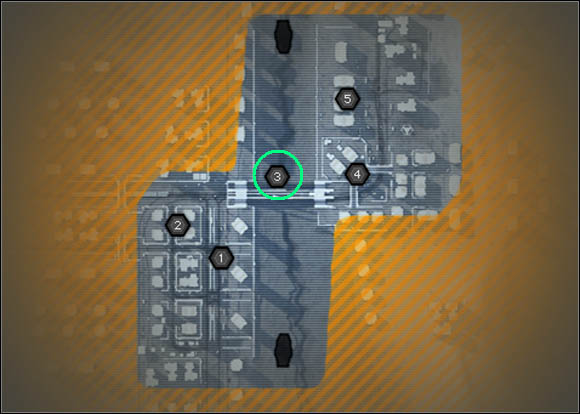
Analysis: Big green circle in the east is the biggest open area on the map. Vehicles and small infantry groups can be spotted there, so Recon soldiers and mechanics with heavy weaponry almost all the time have a job to do over there. [1] is a complex of structures, built on some kind of small hills. However, snipers from both teams sometimes find there a few targets. Goliath can be spotted in that region too. [2] is the bridge where Engineers' (with rocket launchers and mines, of course) activity is quite high. Vehicles using the bridge cannot manoeuvre freely, so they're easy targets. The last important point is [3], where a stationary anti-vehicle cannon Rosch Mk-S8 has been installed. This one is unique, as its operator sees the whole open area nearby. Teams has their bases in points [I] and [II]. In there, they have battlewalkers, APCs, Goliath and Hachimotos at their disposal. And fight hard for the flags placed at the ends of the bridge, because they give additional walkers.
Strategy for EU: The team starts in a strategically bad position. In order to take control of the first flag on our way, a well-supported Goliath should be sent into the battle. Moreover, search for the gaps in the enemy's defence and use them to get on the eastern side of the map. Control points over there gives the team additional support, as the battlewalkers coming from the PAC base can be stopped and destroyed even before they reach the bridge. The worst thing that could happen during the battle is when EU controls the west bank of the river and PAC controls the east bank. In such situation, the fight takes place on the bridge, which is easily defendable for the opponents and extremely hard and exhausting for us. If the team manages to hold some flags in the east, it will be possible to get to the bridge defenders and shoot them in their backs.
Strategy for PAC: Use the geometry of the terrain to fight the EU. There are many hideouts in the west, prepared specially for snipers and mechanics shooting at enemy infantry and Goliath. Moreover, I advise you to deploy mines on the bridge, so unauthorised people won't get to the flags located in the east. However, if the enemy manages to get there, the PAC forces will have to kill themselves to waste all the opponents in the east. Pay attention to flags at the ends of the bridge - controlling them gives the team additional heavy support and weakens the EU at the same time.
Titan mode:

Struggles in the Titan mode differs in only one thing - some of the fights take place on the ice, because of a missile silo (marked with a green circle) standing on the ice and Titans hovering right above the Rhine. And better leave the Titans in their starting position.
You are not permitted to copy any image, text or info from this page. This site is not associated with and/or endorsed by the developers and the publishers. All logos and images are copyrighted by their respective owners.
Copyright © 2000 - 2026 Webedia Polska SA for gamepressure.com, unofficial game guides, walkthroughs, secrets, game tips, maps & strategies for top games.
