Winning Eleven 9: Nuances of the control
Every of assumptions presented below don't have to be met at the given moment of the action. There are no guidelines determined completely, they are only probable. Dependence is resulting from:
- attributes - there are no players without attributes, there are only players without high values,
- players' form - the player with high form able to win the match, it is necessity (!) to play on this player particularly if he is quick (Pace), a he is good dribbler too (Dribble Speed),
- current result of the match - it was tested. Attributes are increasing at a given moment for player of winning team; losing players' attributes are falling. And therefore it is so difficult "to return to the game". Values of attributes are increasing too (exclusively) at ends of parts of the game - only, when team is losing. Attention: if attribute Mentality is high (above 90), it can happen just the other way.
There are four basic movements of players: the passing, the catching, the shot, taking back the ball. Mastery of every element in the basic mark doesn't guarantee high victories - it is helping only at playing the ball. The rest is lying in the player's competence, especially taking advantage of the attribute Teamwork and knowledge of the own and the enemy's formation.
Passing
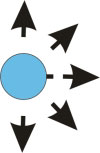 | We are able to pass to every of eight available directions. Certainly not every will be so accurate as the attributes are pointing for it. There is principle that five directions are most accurate. The rest will depend on the high attribute Passing acc. Passing of the first ball (and in the run or the sprint) are usually less accurate, about the 1/4 value of the attribute. Let us not forget about the long passing - is very easy to intercept, but extremely effective. |
Centring
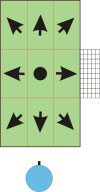 | It is possible to pass to any place in the penalty field provided that the player is located in the given zone - the ball will always be directed at his direction. If nobody is in zone the computer will take the nearest player in other, adjacent zone. If nobody is in the penalty field, the ball will usually be played to the center of the pitch. |
Shooting
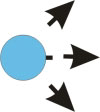 | Three positions of the player are most accurate. The rest depends on the attribute Shot technique. Every shot performed at the posture of the player changed of 90 degrees in the attitude to the goal, will be marked by the weak kick of the ball (small speed). It will usually be wide too, and not infrequently high. In this position we can take good shot only with [] ~ R2. |
The technique of the shot is describing the moment of the kick and the height of the sent ball. You also should know that the moment depends on player too, who pushing the key of the shot is sending the height indirectly - especially at shots from the first ball. For example, when the ball being centered for the attacker is pointing the chance to kick (not head!) from the first ball, we will notice then that the player will try to execute the shot in dependence on the ball height. Almost same situation we find when heading.
There are two speeds of the shot bar existing. The first is essential and is occurring in all situations apart from of the ones mentioned in second. This one however is showing up when: shooting from first ball, as well as when the player can't perform any movement, because he is in the first phase of the catching the ball. It lasts about 1/5 second.
It is necessary to mention "Driven Shot". It is specific kind, possible only to perform when giving the shot from the first ball. In order to perform it, it is necessary to push [] at the moment when the ball is falling. Intention realized well, will be resulting in the very strong shot, kind of the lob.
If we stop the ball with R1 or R2 and we perform the shot from this position, it will have features as performing [] ~ R2 - controlled shot.
1-2
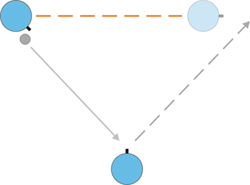 | Very effective move, although initially hard to learn. There are two variations of this combination. One of them relies on the passing and running away, other on passing, running away and giving back the ball with one of methods. The most simple is X ~ R2. It can serve not only to exchange passing, but also to creating "chaos" and immediate attacking - a few passes performed in this way will be enough to create combinative attack. X ~ R2 and L1 + X are identical moves. |
Nuances of the formation and the strategy
Two hypothetical formations, completely not suiting to oneself. It is possible in theory to bet bigger chances on "blues", however we don't stay behind rivals thanks to few tricks in the strategy. It is the demonstration of course of one match when using the following formations along with the discussing on more interesting pitch behaviors.
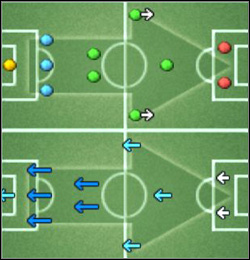 | "Reds": Simple 3-5-2 formation. Advantage: tightening of the central field of the game, usually effective locking the rival on the own half. Disadvantage: three defenders are not giving full covering of the line. Line up Team strategy: Back Line A, Zone Press A, Offside Trap A, Counter Attack A.
|
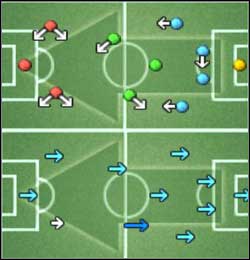 | "Blues": Offensive 4-5-1 formation. Support of wingers for the attacker, giving the opportunity of the full maneuver in the counter-attack. Advantage: immediate transition to the attack, outstanding possibilities in the positional attack - even play with eight players. Disadvantage: too small tightening of the center of the field sometimes. Line up Team strategy: Back Line B, Zone Press B, Offside Trap C, Counter Attack A. |
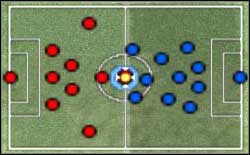 | Initial set up of players. Let us take note on two defensive helpers at "reds" - they will be accompanying us during the meeting nearly through the whole time. Let us look at the line of defense both of team. On 40 meters of the width at "blues" are four players; at "reds" only three defenders have to fulfill their tasks. |
 | On time of executing of the corner kick the shift to the attack of four "reds" players is occurring. One of wingers is executing the throw. Three players are waiting for the counter-attack in the center of the field: CF, LWF and RWF. Their only chance of the escape will be disperse to wings and the individual sprint to the direction of the goal and possible subsequent center. Two "reds" DMF will try to underwrite opponent's actions supporting own defenders usually on wings. |
 | Theoretical advantage "reds" in the middle of the field isn't giving the certainty for lack of the place to "blues" for playing the ball. Tightening the formation in the width is the effect of the arrangement Back Line A. The problem is, that at the given moment three attacking "blues" are ready for immediate run to the ball. It will be sufficient to run them with the high perpendicular passing. But because we arranged for team "reds" Zone Press A, thanks to pressing we are inclining enemies to retreat the ball into the range of their defense. |
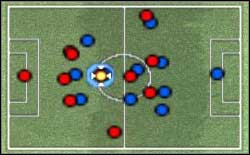 | Two interesting facts: "reds" defenders are individually covering "blues" attackers; "reds" LMF is being kept an eye by "blues" RB. |
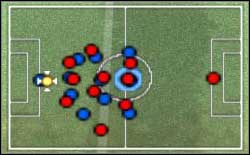 | Line of "reds" defense arranged dangerously high is theoretically guaranteeing the ball return to the "blues" half. But don't forget about three attackers, one error of the defense and the attack will be taken in the very big area. |
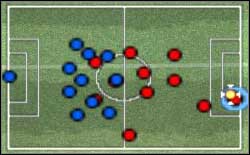 | Situation almost similar to previous, but on the other side of the pitch. With moving the formation "blues" are presenting "reds" in the way: positional attack. |
You are not permitted to copy any image, text or info from this page. This site is not associated with and/or endorsed by the developers and the publishers. All logos and images are copyrighted by their respective owners.
Copyright © 2000 - 2026 Webedia Polska SA for gamepressure.com, unofficial game guides, walkthroughs, secrets, game tips, maps & strategies for top games.
