
Sniper Ghost Warrior Contracts: Beketov Valley Walkthrough
Beketov Valley is the third location in Sniper: Ghost Warrior Contracts. It differs quite significantly from the rest in terms of where the action takes place-there is more vegetation, which allows you to effectively sneak to avoid detection. There are 5 contracts to complete, as well as 6 challenges, 6 collectibles to gather, and 2 Bounties. This Chapter describes walkthrough of the Beketov Valley.
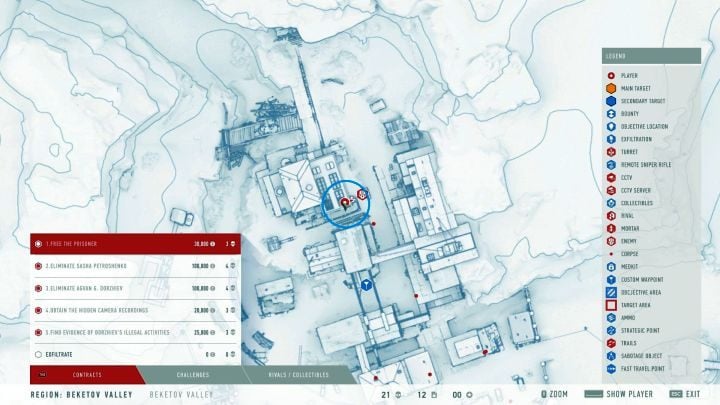
The map does not show the positions of enemy units. The reason is simple-in each location there are more than 100 enemy soldiers, eliminating them does not pose any problem, none of them is particularly dangerous, and placing them on the map would cause it to be unreadable
- Contracts
- Challenges
- Collectibles and Bounties
- Free the prisoner
- Eliminate Sasha Petroshenko
- Obtain the hidden camera recordings
- Eliminate Agvan G. Dorzhiev
- Find evidence of Dorzhiev s illegal activities.
Contracts
The following contracts are waiting for you in the Beketov Valley:
- Objective 1: Free the prisoner
- Objective 2-Eliminate Sasha Petroshenko
- Objective 3: Eliminate Agvan G. Dorzhiev
- Objective 4-Obtain the hidden camera recordings
- Objective 5-Find evidence of Dorzhiev's illegal activities.
Challenges
The player can participate in additional challenges such as:
- Kill 5 enemies through an obstacle.
- Kill 5 enemies from a 200m distance.
- Perform 10 double kills.
- Interrogate Dorzhiev.
- Kill both targets from more than 300 meters.
- Complete all contracts using only stealth kills.
Collectibles and Bounties
There are also 6 collectibles to find and 2 bounties. The targets that have to be eliminated have been described at the end of this chapter. We have marked the location of all collectibles on the map (a detailed description of secrets and collectibles can be found on a separate page of this guide).
Free the prisoner

As soon as you regain control of the character, hide in the grass-there are a lot of enemies nearby, so detection will end with quick death. Go to the remains of the building ahead, wait until two soldiers go to the side and sneak up to the soldier going to the left-approach him from behind and interrogate him to get information about the location of the nearest soldiers. Drag the enemy's body into the grass.

Here you have two options - you can knock out the enemies, but most likely it will end up with alarming them (unless you spend a lot of time and eliminate them from your grass cover) or ignore them and head for your first contract southwards. If you have decided to fight, first eliminate enemy snipers (the wheel icon).

Moving to the South, you encounter an enemy patrol in an armored car-there are only a few targets. Eliminating them will not be a problem. When you enter the contract area, stick to the right side at all times-climb the rocks and continue upwards. There you will find a sniper lying in the grass, so kill him quietly.

Lie down on the edge of the hill, and first of all, find the disruptor located in the base - its location can be seen in the image above. Shoot the control panel to disable it-now you can safely mark your targets.

Your target is the prisoner in the southern part of the base- you have to get to him and save him. There is a catch, however - if enemies are alerted, you will have 180 seconds to clear the camp of enemies, otherwise the prisoner will be executed. Try to quietly knock out as many enemies as possible - if the enemies find you, quickly clear the camp, get to the prisoner and get him out by shooting the lock on the door.
Note-there are several vehicles in the camp that are likely to open fire at you when you're made. You can get rid of them with grenades or shoot the fuel tanks in the back (use Mask Mode to find these points more easily).
Eliminate Sasha Petroshenko

When you rescue the prisoner, loot the corpses, replenish ammunition and head towards the place of the second contract, to the east of your position. On the way you will find several small enemy posts manned by 2 to 5 soldiers, with some automatic turrets.

When approaching at a distance of 200-250 km to the place of the contract, you will receive information that your next target, Agwan G. Dorzew is heading to meet with Sasha, Petroszenko, so you will be able to shoot down two targets at the same time. Go to the enemy base to the North -there you will find a number rock located by the water, which is a great point to start shooting at the enemy. You will also find a sniper lying in the grass-interrogate him to find out the location of enemy soldiers.

Start with the snipers (the wheel icon) and individual enemies. Then keep an eye on the remaining soldiers - try to take them down in places where their death will not warn their comrades.

You will find Sasha Petrochenko in his apartment building, located approximately in the center of the object. Kill him to fulfill this contract.
Note-here you will have the chance to also kill Agvan G. Dorzav. There's a chance he hasn't escaped to his hideout yet and is waiting in one of the cars in the Parking lot. This is worth checking out, because it greatly facilitates the further progress of the mission. If you don't find him there, move on to the next part of this Chapter.
Obtain the hidden camera recordings

Before leaving the place where Sasha Petrochenko was, it will be necessary to fulfill one more contract-obtain records from hidden cameras. They are located in the sauna-in the same building in where Sasha was. Go to the sauna, and then in a small room on the right-shoot glass to get there and collect records from the camera standing on a tripod.
Eliminate Agvan G. Dorzhiev

It's time for the main goal of this mission - the elimination of Agvan G. Dorzhiev(if you haven't managed to do it after the murder of Sasha Petroshenko). Head North from your current location. Watch out for enemy patrols hidden in the woods.

Despite the fact that this is the main contract of this location, the base in which Agwana hides is small and there are not many soldiers there. Most of the enemies are also far apart making silent takedowns easy to perform. Enemy patrols comprising 2 soldiers make it easy to perform a double kill (one of this location's challenges) - wait for them to stand in a straight line from your perspective and shoot even to kill three targets at once.

Infiltrate the base and eliminate enemies. Beware the sniper at the very top of the metal ladder. You will find Agwan in a large building in the Northern part of this location - if the alarm is activated, he may be somewhere between the buildings, so you will need to find him. Kill the enemy and collect the key that will come in handy for the last contract.
Find evidence of Dorzhiev s illegal activities.

After the murder of Agvan G. Dorzhiev, it is time to complete the last contract-to find evidence of his illegal activities. Pick up the key from the corpse and then use it to open the door in a small part of the building that Dorzhiev was originally in - the location is shown in the image above. Inside you will find said evidence.
All contracts in this location are completed-now you can search for collectibles (the way to get them is described in a separate chapter of this guide) or complete challenges - if you want to complete this stage and move on to the next, go to any exfiltration zone.

- Sniper Ghost Warrior Contracts Guide
- Sniper Ghost Warrior Contracts: Game guide
- Sniper Ghost Warrior Contracts: Walkthrough
- Sniper Ghost Warrior Contracts: Altai Mountains Walkthrough
- Sniper Ghost Warrior Contracts: Kolchak Harbor Walkthrough
- Sniper Ghost Warrior Contracts: Beketov Valley Walkthrough
- Sniper Ghost Warrior Contracts: Arakchayev Fortress Walkthrough
- Sniper Ghost Warrior Contracts: Sibirskaya-7 Junction Walkthrough
- Sniper Ghost Warrior Contracts: Walkthrough
- Sniper Ghost Warrior Contracts: Game guide
You are not permitted to copy any image, text or info from this page. This site is not associated with and/or endorsed by the developers and the publishers. All logos and images are copyrighted by their respective owners.
Copyright © 2000 - 2025 Webedia Polska SA for gamepressure.com, unofficial game guides, walkthroughs, secrets, game tips, maps & strategies for top games.