Silence: Chapter Two
In chapter two Noah and Renie are trying to get to rebel's camp and then find Janus. To do this:
- Free Horus and Samuel
- Save Kyra
- Dispose of Seeker
- Go through the door with bird symbol
- Close all flowers and chase the Seeker away
- Bring Stone Brothers together and open stone gate
- Get the shard
Free Horus and Samuel
When Renie and Samuel will come to the clearing, look at the carnivorous plant which has caught Horus, bird which is a messenger of rebels. When the plant will catch also Sam, hit it several times (you can also kick it which is necessary to do to get the achievement). Sam and Renie will find out that they need something which has a bitter taste.
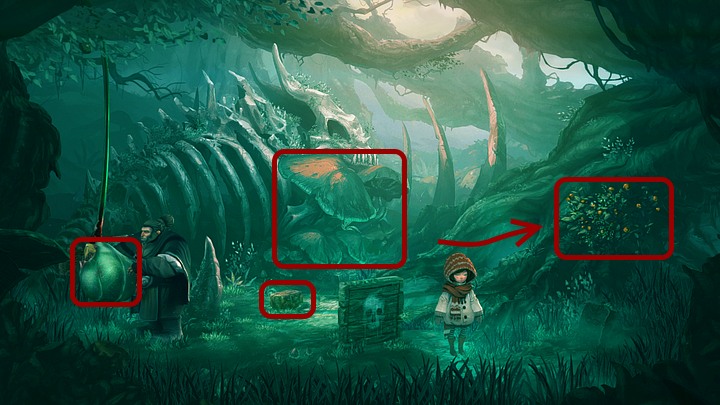
Try berries from the bush on the right (click the bush and move cursor down). Unfortunately, the berries aren't bitter. Try also mushrooms (in the middle of the screen; if Renie tastes them several times - as long as she passes out, you will get Keep away from children achievement), zoom out and go through the roots to the right.
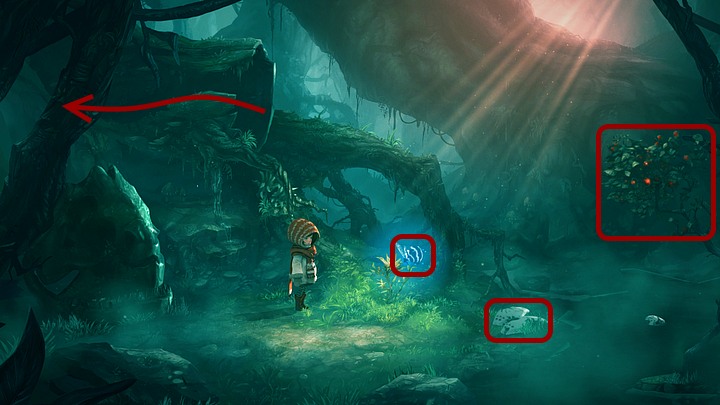
There notice a honey tick (on the plant). Click it - on the ground will appear hot honey. Notice another berry bush (on the right). Use masks lying near the tar pit to build a bridge (take one mask, cursor will turn into mask shape - drag it and overlay both symbols (cursor and mask on the tar pit) and left-click. Go through the bridge and help Renie keep her balance until the contour of circle won't be all white. Shake berry bush (by pressing LPM move cursor to the right and to the left). Try to pick up a berry from the ground - if the fish will be faster than you, shake the berry bush once again. (If the fish three times will be quicker than Renie, you will get Do not feed the fish! achievement. If before eating the bitter berry Renie will try to eat everything she can - cursor in the shape of tongue - sweet mushrooms berries, wet moss, big skull, and tar in the hole, you will get Haute cuisine achievement).The berry is bitter so shake the bush again and take three berries.
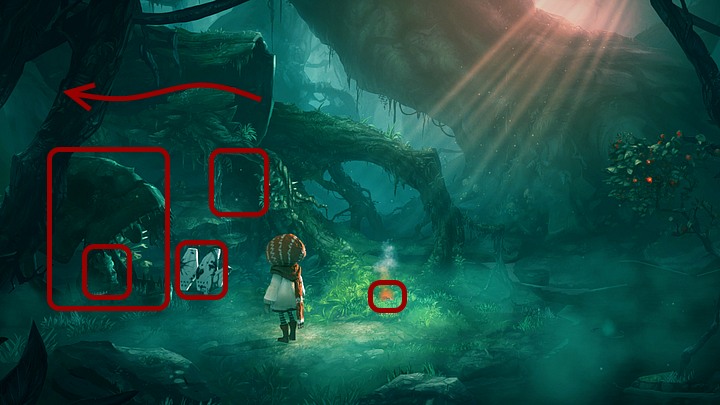
Now kick small skull (it is necessary to do to get the achievement) and take knight's helmet which was hidden inside. Use the helmet on the hot honey (orange fumy stain in the middle of the screen). (If you pour a little bit of honey on the swamp and set this on fire, you will get I didn't do it achievement. To get this achievement you can also use the mask on the honey but you need to do this before you pick up the helmet).
Go back to Sam, you need something that burns well. Click the plug (middle of the clearing). Pour the hot honey on the swamp gas.
Go to the right and notice moss (below roots). Go back to Sam and put the helmet with water on the fire. Use the extract on the carnivorous plant. Finally, try to catch Horus to take away from him a message from Janus.
Save Kyra
When Noah and Kyra will come to the honey tree, talk with Kyra and give her leg up (move cursor up). If you click Horus, you will come back to Renie. (If you use on honey tree Flat Spot, you will see a bug hidden behind the roots - which is necessary to get the achievement. Also you can kick a flower root which is necessary to get the achievement. You can use Spot on this root which is necessary to get the achievement. You can use Flat Spot on the hole as a bridge which is necessary to get the achievement. Also you can hit the tree by throwing Balloon Spot onto it and use normal Spot on secret message from Janus which is necessary to get the achievement). Then talk with Kyra again and kick the honey tree (it is necessary to do to get the achievement). Do this several times - the effect will be unexpected.
After Kyra's disappearing, click honey tree to make Noah and Spot show themselves. Notice hole on the left and go underground.

(If you just after entering the hole ask Spot to come back, you will get Summit attempt achievement but only when Spot was trying earlier to climb up honey tree).
In the queen bee's hole click Spot and ask him to jump above the queen's tentacles. Click Spot once again and ask him to royal jelly (on the ground, on the right side). Then use Jelly Bee Spot on tentacles or queen bee. When queen will be calmed down, go to the right. Kyra is hanging in the cocoon on the right, but there is a gap under it (if you look into this abyss, you will get Wooooow! achievement), so you need Spot's help once again.
Click Spot and make him Flat Spot, then use him to make a bridge (click Spot on the gap). Click bridge and try to jump (move cursor down) to catch the cocoon - it's too high. Leave the bridge and use Spot to calm down the queen by asking him at first to drink royal jelly. Leave the hole (to the left).
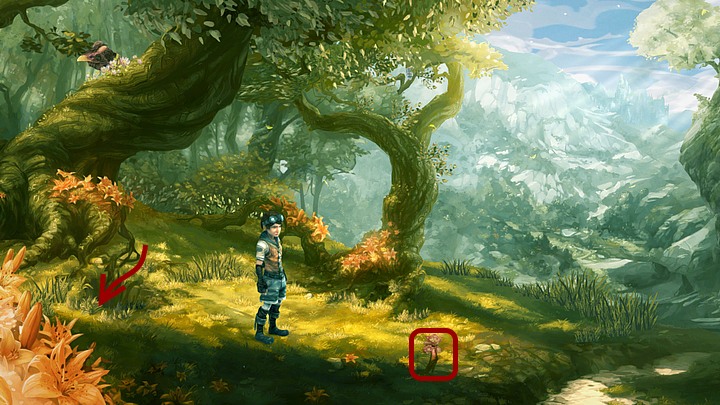
Being outside notice root with blossom (below the tree). Come back to the hole and stay on the left side. Click Jelly Bee Spot and use him royal jelly. Change him into Flat Spot and use as a bridge on the gap. Go outside. Click root with blossom and move it up. Go once again into the hole, when Spot will calm down the queen, go to the right. Change Spot into Flat Spot and ask him to make Spot bridge. Then click cocoon.
Look at Kyra, check vital signs (ear cursor on chest), do cardiac massage (cursor in the shape of outstretched hand on heart on chest), then give mouth-to-mouth resuscitation (cursor in the shape of mouth on girl's mouth), then slap her in the face (hand cursor on Kyra's a cheek; if you do this several times as long as you slap her really hard, you will get The hands of a healer achievement). Click Spot and after zooming out use Spot on royal jelly and then on tentacles. Take one tentacle and use it for defibrillation (click on Kyra's chest and wait as contour of the circle won't be all white).
After conversation with girl, being outside pick up a secret message, then snatch the message from Kyra.
Dispose of Seeker
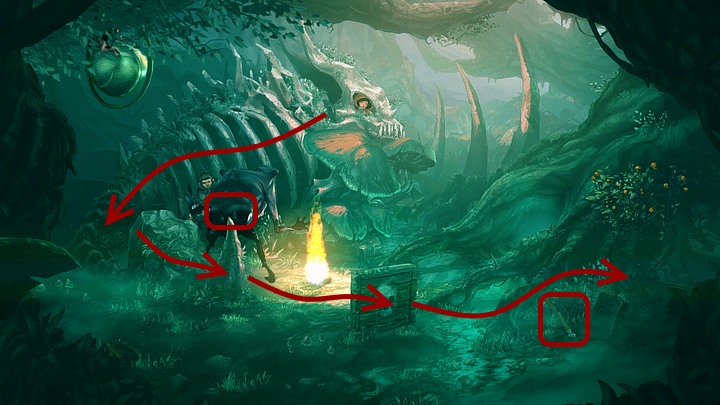
When Seeker will turn and won't be looking at Renie, click part of skeleton on the left (hideout) to let girl to hide behind it. Then go to the next hideout (to the right), of course only when Seeker will turn back to Renie. Move cursor to the right to free Renie. Go to the next hideout (to the right), this time you need to move cursor up to free Renie's shoe. Take spear (near the warning sign), drag cursor in the shape of spear and overlay both spear symbols. Move gun-sight on Seeker's abdomen and click it.
Go through the door with bird symbol
During the conversation choose whatever options you want. When Renie will fall asleep, talk with Janus and Kyra. Look at the message on statue. Talk with Kyra and Janus once again. Choose the direction (up or down) where you want to go to find Janus.
No matter what you choose, Noah will come to the sliding gate. Move it (move cursor to the right) and go inside quickly before the gate will close.
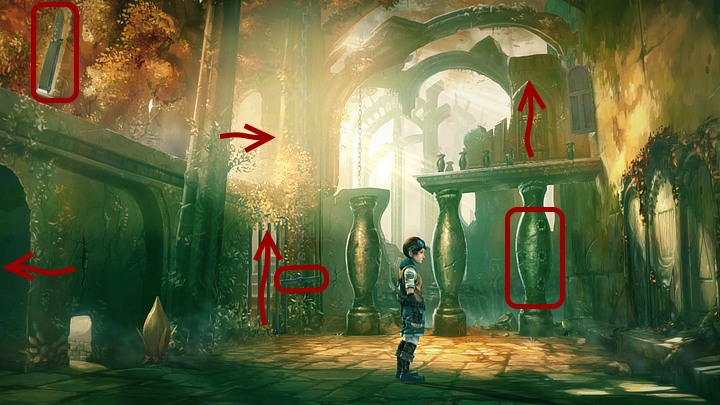
Inside you will find a door upstairs. To climb up you need three bars which you can use as rungs.
At first look at the chandelier's safety bolt (near the grate). Pull it out (move cursor to the right). Then look at heavy grate and open it (move cursor up). Go through the grate, Noah will appear on the gallery on the left. Look at the closed window. Pull out a rung (move it up). Come downstairs (arrow on the second window). Go outside (sliding gate).

Here look at the old well. Put shutter on the well (drag the symbol of shatter and overlay both shatters symbols). Click the leaf pile on the left - Noah will find a dog's statue. Put the guard dog on the well. (If you check the second leaf pile, you will find another flying crab which is necessary to get the achievement). Climb up on the statue and take snakeheaded waterpipe which is above the well (wait until the contour of circle won't be all white). Move sliding gate to the right and go inside.
Calming down snakes
Look at the relief next to exit. It shows (from the left) lute, flute and triangle. Every of the instruments can change its size to small, medium or huge. Small lute has two buttons on each side , medium has 3, and huge has 4. Small flute has 6 pipes, medium has 8, and huge 10 pipes. Triangle has also three versions which are changing in the following order: small, medium, huge, once again small etc.
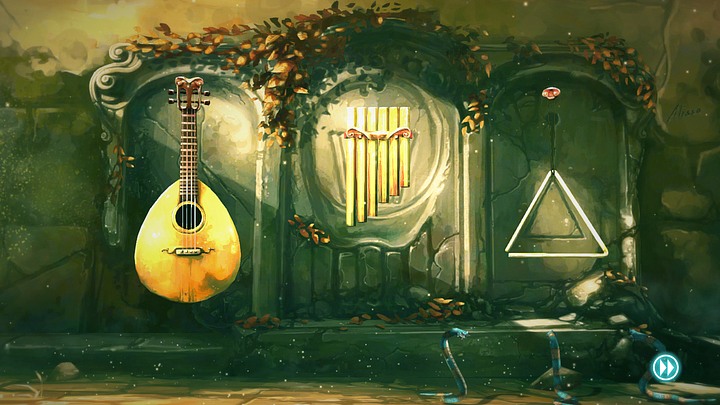
Click them to change their size to small like on the picture above (one click on lute, two on flute and two on triangle). When the instruments start to dance, snakes will stop moving. Take snakes and use it on the pillar (as rungs). Climb up and go through the door with Horus' symbol.

Being next to the crater, take bird whistle lying near the stairs on the left. (When Noah will use the whistle to call Horus, you will have the option to control Renie instead of Noah). Look at the face-shaped stone which is lying under the huge stone - Noah will think he recognizes Ralv. (If you pierce the bubble on the left, you will find another flying crab which is necessary to get the achievement. If this is the third bug - one was near honey tree and second in the pile of leaves near sliding gate - you will get Quite a buggy game achievement). Go to the right (exit the crater). There is a Seeker, so quickly retreat (to the crater; in other case you will die which is necessary to get the achievement).
Close all flowers and chase the Seeker away
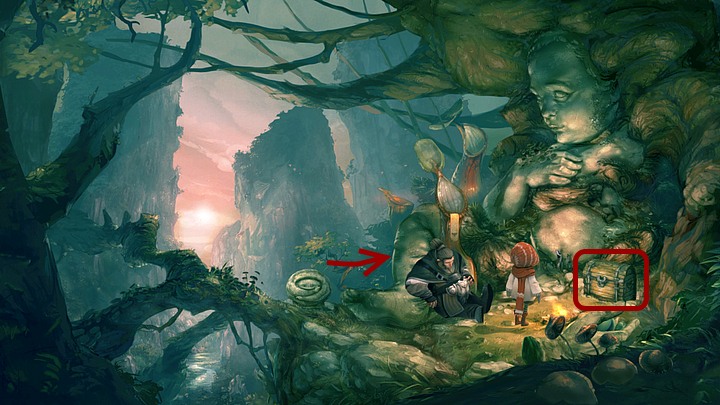
While Sam is sleeping examine the chest on the right. When Renie opens it, check what's inside and take a Sadwick's hat. Then put it back and take a music box (if you decide to drag it, click and move the cursor down). Take a flare gun from the chest, aim at apple (on the tree) and shoot (move the gun sight on the apple and click LPM).
When Renie fails with getting Noah's and Sam's attention (if you decide to pull Noah's sleeve, click his right hand and move cursor to the left), go up the mountain.

Because the girl can't move the sliding gate, click Spot and ask him to eat the mushroom (near the wall). Then go through the small gap in the wall. Spot is allergic to pollen and needs to wait outside. Return to Spot. (You can use Spot on the pile of leaves on the left which is necessary to get achievement). Make him Flat and put Spot under the guard dog, them make Balloon Spot. Pick up the shutter (click it and move cursor up), Renie will throw it into the well. (On uncovered well you can use Flat Spot which is necessary to get achievement). First flower will close itself. Go through the small gap on the other side of the wall.

Use Spot abilities once again and click the heavy grate (on the left). Go through the grate. Change Spot into his Flat version and use him on window. This will close the second flower. Being upstairs, click chain (above the grate), Renie will fall down and the chandelier will go up which will close the third flower. Click the cursor (in the shape of chain) drag it and move on the chain symbol on the grate. Climb up the ladder. Go to the left and click Spot. Go through the door with bird symbol..
Choose any option you want to check Seeker's reaction. Then 'talk to him'. Talk with him again and try to throw him into the lava. Click the ear cursor- Renie will find out that he is seeking the shard. Exit the crater (to the right).
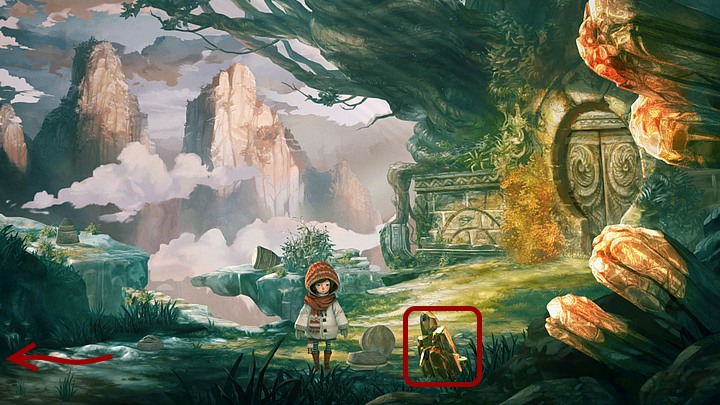
After conversation with Yngo look at quartz (on the bottom of the screen). When the girl with pick up a stone, hit the quartz by using this stone (several times). Go back to the crater and use shard on the Seeker.
(If you as Renie pierce the bubble on the left bottom corner of the screen, and you did this before as Noah, you will get Bubble Killer Family achievement. If you use Balloon Spot on the fountain or lava lake, you will get Master of Thermodynamics achievement. When Balloon Spot will fly down in the next location, you can turn him into normal and use him on prayer mill which is necessary to get achievement. Then you can make him Flat and come back to Renie. You can use Spot on Yngo as long as Yngo is without Ralv which is necessary to get achievement).
Bring Stone Brothers together and open stone gate
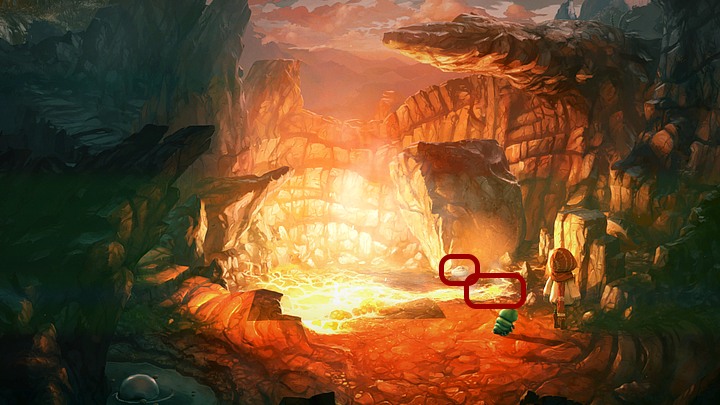
When the Seeker runs away, talk with Ralv. Change Spot into Flat Spot and use him as on lava fountain near Ralv. Jump on the Spot bridge and jump once again before circle's contour will be all white. Try to lift Ralv, but he doesn't won't to be carried, so roll him by moving the cursor down.
When Stone Brothers will be together, Renie will find out that to open stone gate she needs to properly turn the prayer wheels. One of the prayer mills (near the quartz) is broken, the second one is beyond the brambles and the third one is beyond the gap.
(If you use Spot on Ralv when he is near Yngo; on broken prayer mill, twice on quartz, and on stone gate, and you have licked four other items before - fartshroom before it will grown up, Kyra on the bridge, prayer mill on the pedestal, Yngo when he was alone - you will get Lollipop achievement).
Come back to crater. Use Spot on his normal form on lava fountain and with Dragon-Spot go back to stone gate.
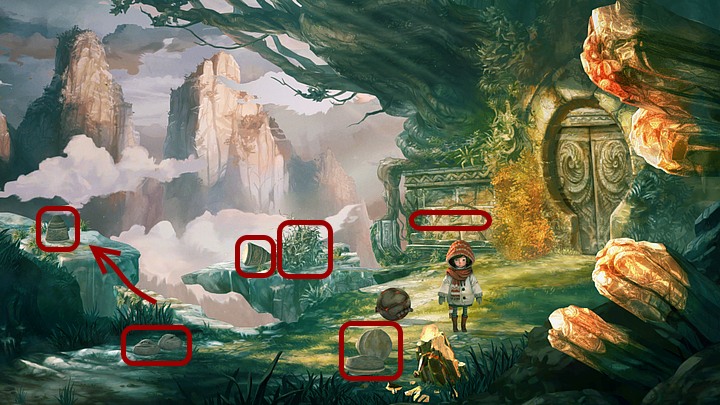
Use Dragon-Spot on broken prayer mill, Renie will repair it automatically. (You can also do the same with Ralv who is sitting near Yngo. If it is Spot doing something unnecessary for 10 times, you will get Useless but beautiful achievement). Go to crater once again and change Spot into his Dragon form. Use Dragon-Spot on brambles which are growing near the second prayer mill. Try to lift the second prayer mill, but it's too heavy. Talk with Yngo and Ralv, you will get to know that there is a magic Song of Stones that allows you to lift the stone wheels with one finger.
To get to the third mill, use Flat Spot as a bridge to let Renie get to the plateau where the stone is lying. Click the arrow cursor (to the plateau) and being next to the prayer mill click it with musical notes cursor. Move stone cursor on the shape of stone which is on the prayer mill fitting.
Click the second prayer mill which is near burnt brambles and do with it the same you have done with the first one. Finally click the third mill and do the same action.
Because Renie doesn't know which side is left and which right, Stone Brothers will tell her a story which indicates how to turn the stones. Click prayer mill fitting to let the story begins.
Turning the prayer mills
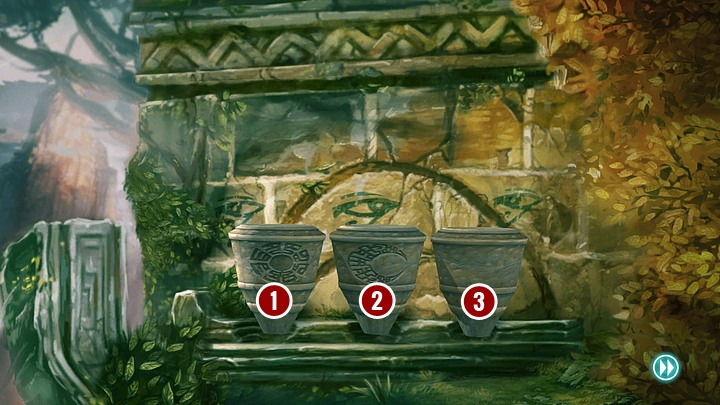
Looking from the left side prayer mills symbolize: life (prayer mill with sun picture), dream (prayer mill with moon picture) and death (prayer mill with no symbols). During the story you need to turn the prayer mill with proper symbol, each time you need to move cursor to the right. The order of turning is:
- third prayer mill (just one thought away from death);
- second prayer mill (in sinister dreams);
- third prayer mill (the closer he slipped towards death);
- first prayer mill (the boy finally awoke);
- second prayer mill (it was more beautiful that anyone could imagine);
- first prayer mill or second or third (the king named his land Silence).
(If as last was turned first prayer mill, you will get Where there is life, there is hope achievement. If as last was turned second prayer mill, you will get Life is but a dream achievement. If as last was turned third prayer mill, you will get Death is a part of life achievement).
Gate will open, but only a little, so Renie can't get through it. Use Spot in his Flat version on the stone gate, then make him Balloon Spot.
Get the shard
After 'conversation' with Janus you need to get the shard lying in the centre of the location. (By clicking Horus you can switch to Renie. You can do this (as Renie) by kicking the wall with prayer mills to get the achievement).
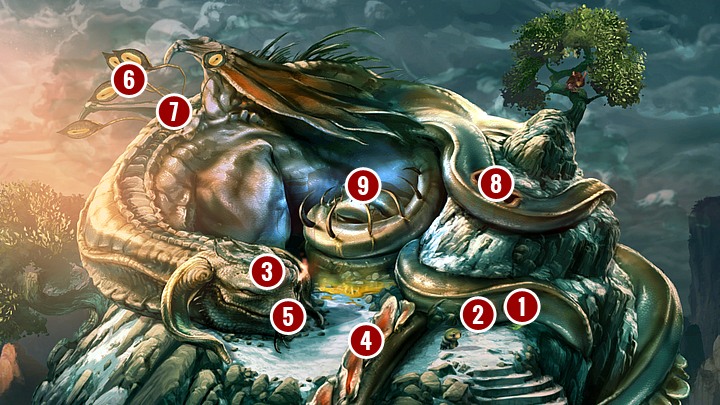
At first eat some of green secretion from the dragon's bottom right nostril (1), then as Sticky Spot pull the rock cork from bottom left nostril (2) by moving the cursor to the left. Get into this left nostril (2). Then get into the nostril above dragon's maw (3). As Blaming Spot burn bottom skin sail (4). Now let the dragon to eat Spot by jumping into dragon's maw (5). As five little Spotties get inside bottom left nostril (2), and while being on the dragon's back, attack tentacle eyes (6).
Then let the dragon to eat you once again. Make Blaming Spot by clicking nostril (3) and burn upper skin sail (7). Once again eat some of green secretion from bottom right nostril (1). Being on the back get into the upper left nostril (8), leave by sing upper right nostril, roll a little bit up (to the left) and stay above the shard (9). Click it and drag cursor up.
When the whole group will be together, during the conversation choose whatever options you want. When Renie will give you Sadwick's hat, take it.
(For ending chapter two you will get Chapter II achievement).
You are not permitted to copy any image, text or info from this page. This site is not associated with and/or endorsed by the developers and the publishers. All logos and images are copyrighted by their respective owners.
Copyright © 2000 - 2025 Webedia Polska SA for gamepressure.com, unofficial game guides, walkthroughs, secrets, game tips, maps & strategies for top games.
