Silence: Chapter Three
In chapter three Noah and Renie with a group of rebels are going to Kalimar, Valley of Fallen Gods and finally to the port. Then they decide to get a ship to travel to False Queen's castle. To get there they need to do following tasks:
- Get rid of Seeker
- Get to Kalimar
- Wake up Kyra and Renie
- Escape from captivity
- Catch unruly Lumis
- Come to an agreement with little girls
- Catch naughty Lumis and get shard back
- Get through the gate
- Set sail and choose the right direction
Get rid of Seeker
When everybody will run to the cottage, as Renie try to free them from Seeker's company. You don't have plenty of time, you need to manage before the Seeker to force the door. (If you will be too slow, and the Seeker will kill you, and earlier you killed Sadwick three times - after leaving World Worm's maws, during blowing up the bridge, and after coming to the stone gate - you will get Sadist achievement).
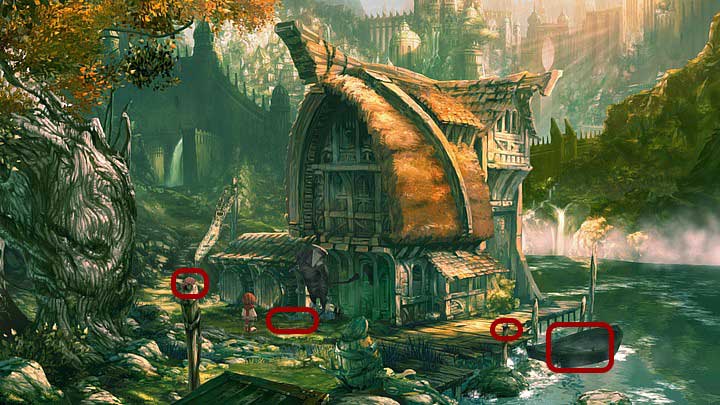
Use on Seeker ear icon to eavesdrop. Don't try to talk with him, because you don't have enough time. Click flying crab (on the peg) to make it fly away. Pick up long rope with noose (it's lying just behind Seeker) and use it on him (drag the cursor in the shape of rope on the identical shape on Seeker). Move the cursor to the right to tie the rope. The other end of the rope use on the boat (by dragging cursor in the shape of rope on the proper symbol). To do this you need to keep the circle in the middle of the line as long as the contour will be all white.
Finally click the rope (the peg near the boat) and pull the Seeker's finger (to the left).
Get to Kalimar
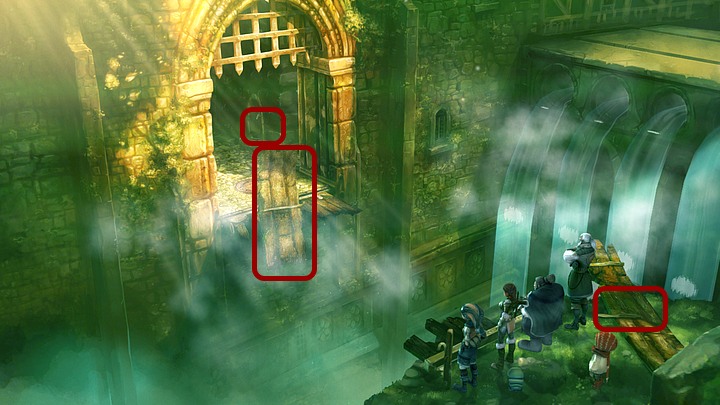
When Kyra's idea with the bomb won't work just exactly as she wanted to, you need to find a way to get to the city through the moat. Click a plankpart which is lying on the right from Janus. Click Spot and throw him on the plankpart on the other side. Use Spot on the upper part of the plankpart and order him to drink water from the well (in the passage, on the right). Ask Heavy Spot to stand on the plankpart.
Going over the abyss
In Renie's pink vision plan order of going from one desk to another to keep balance. So:
- Renie from right plankpart to the left;
- Sadwick from right plankpart to the left;
- Sam from right plankpart to the left;
- Spot from left plankpart to the right;
- Janus from right plankpart to the left;
- Renie from left plankpart to the right;
- Kyra from right plankpart to the left;
- Renie from right plankpart to the left.
- Spot (automatically) from the right desk to the left... well...
(If you get everybody to the gate in 8 moves, you will get Checkmate in 8 moves achievement).
When the desk from the right side will fall down order Spot to jump on the plankpart on the left ('jump' on the plankpart). Unfortunately, poor caterpillar will fall down into the moat.
When Noah will stay alone near the gate (being Sadwick now), raise a manhole cover dragging cursor up. When Sadwick will freeze for a moment, drag cursor up once again to let the boy hide before the Seeker will catch him.
Wake up Kyra and Renie
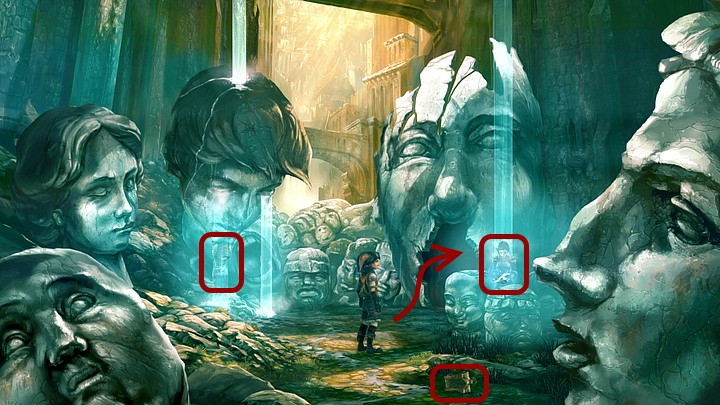
Being in the Valley of Fallen Gods, notice that Renie and Kyra turned into statues, one of them is below the huge stone head of crying boy (on the left), and the second is between two smaller heads on the right. Look also on the lantern which is lying on the bottom of the screen (you will need it soon). Through the hole in the huge head go through to the oracle. Talk with Shana (choose whatever option you want to).
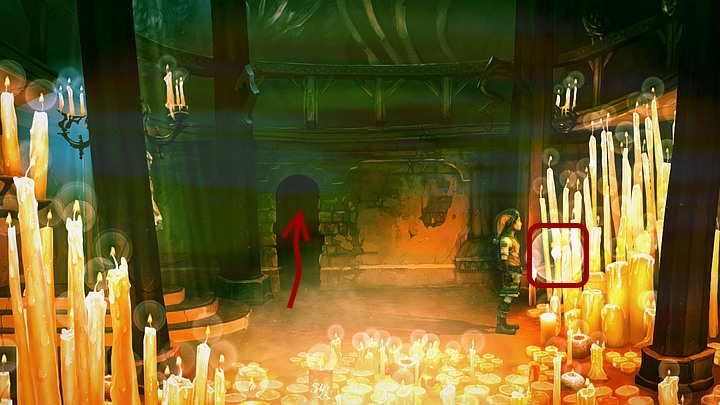
Candles which are here are life-lights, so you need to find Renie and Kyra's candles to make them free from the statue's forms. Click candles on the right - there is Kyra's candle (choose proper dialogue's line). (If you start with examining the candles on the chandelier or on the bottom of the screen, Sadwick will sneeze, and you will get Achoo!! achievement). When this candle will blink, take it from the others and go outside - you need to give it to Kyra. Try to give the candle to Kyra, when that doesn't work, try to put it into the lantern. Because the candle is too long, break it twice (click the line). Sadwick will put short candle into the lantern. Use the lantern on statue of Kyra. When shard fells down near Sadwick, pick it up.
(If you hear all Sadwick's commentaries about Kyra's statue - you need to click it twice after coming to the Valley of Fallen Gods, then three times after talking with Shana before you get Kyra's candle; then three times when you have this candle, once when you put the candle into the lantern and give it to Kyra, and the last one when you have Renie's candle - you will get achievement Shut up, clown!).
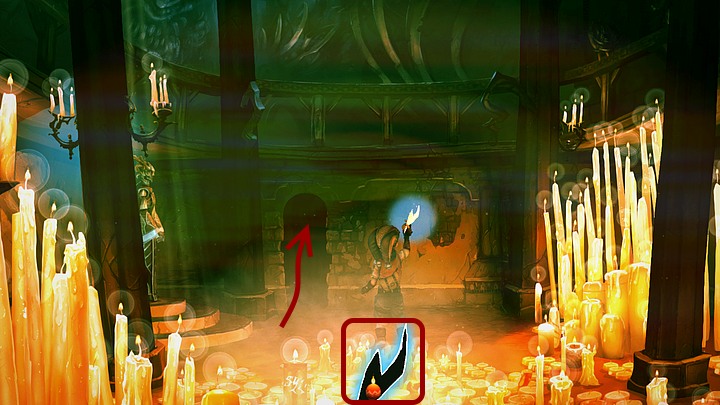
Come back to the oracle. Use the shard on candles, then move cursor slowly as you will see through them Renie's candle - Sadwick will take it automatically.
Go outside and try to give Renie the candle. Put her candle on the throne (in the middle of location) and click statue of Renie. Pull it out by dragging cursor to the right - Sadwick will put girl's statue on the right side of the throne. Now take from the throne Renie's candle and give it to statue of Renie.
(If you try to put candles in every possible place: Kyra's candle give to Renie, put it on the throne, give Kyra candle before putting it into the lantern, put the candle into the lantern, give Kyra the candle in the lantern; give Kyra Renie's candle, put it on the throne, and then give it to Renie, you will get Fastidious clown achievement).
During the next conversation with Shana choose any of the options you want to.
Escape from captivity
As imprisoned in the cage Spot, make yourself Flat and get through the bars (place near the cage pointed as 'escape'). Now change into Balloon form and roll to the left. You will get caught, but Balloon Spot will throw away a wig which will fall down near the cage.
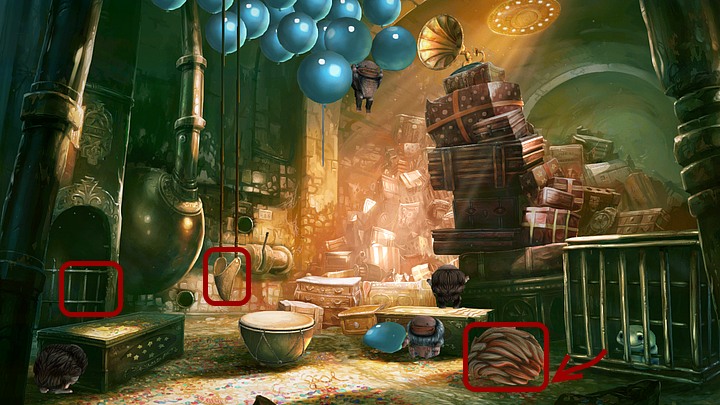
Of course make yourself Flat again and get outside the cage. Get under the wig. Lumis which are imprisoning Spot aren't very clever and moving won't make them suspicious.
Go under the rubber slingshot (on the left from kettledrum) and pull it by dragging the cursor down - Spot will jump on the balloon. Don't let him fall by trying to set cursor's circle in the middle of the line as long as the contour of the circle won't be all white. (If you in every balance check won't fall, you will get Artistic master achievement). When Spot will fall down near the exit, click tangled balloon. Now you are free.
(For checking all Spot shapes which the gameplay allows you, you will get The Green, the Fat, the Ugly achievement).
Catch unruly Lumis
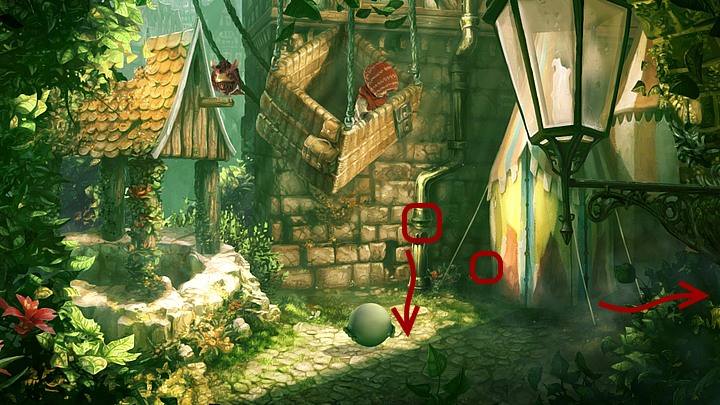
After the accident as Renie who is afraid of jumping on the ground from the balloon, make Balloon Spot and point him the place marked as 'jump down'. When Lumis appear, Spot will hide. After their leaving click the 'balloon' on the left side of the tent to call Spot. Through the broken pipe (on the left side of the tent) talk with Sadwick.
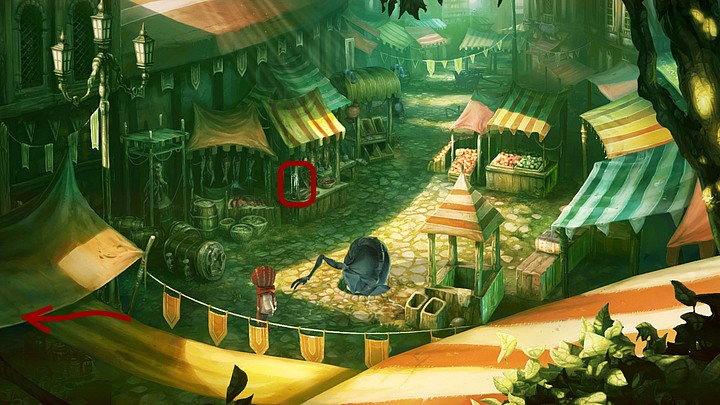
Then go to the market place on the right. Look through the cover of the sewer - you will find a place from where Spot has escaped. Lumis are there and shard too. Unfortunately a Seeker will come here too to see what's under the cover.
From the fish booth (on the left) take hook and line.
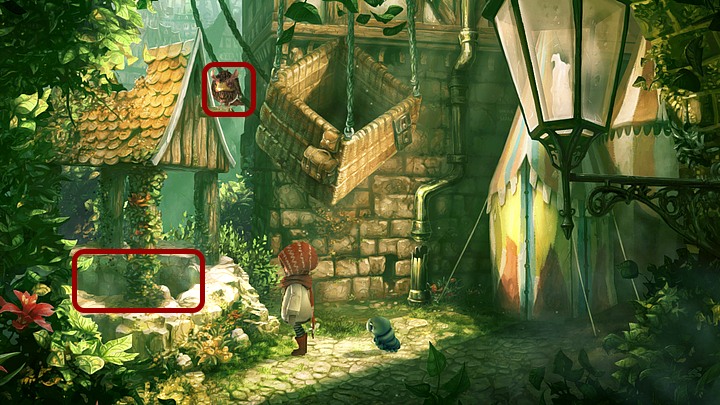
Come back to the crash site and throw the hook and line into the well (on the left), where little thief with the shard has jumped. Pull it out by dragging the cursor to the right. Unfortunately nothing was caught - you need a bait. Click Horus, who is sitting on the peg above the well to come back to Sadwick.
Come to an agreement with little girls
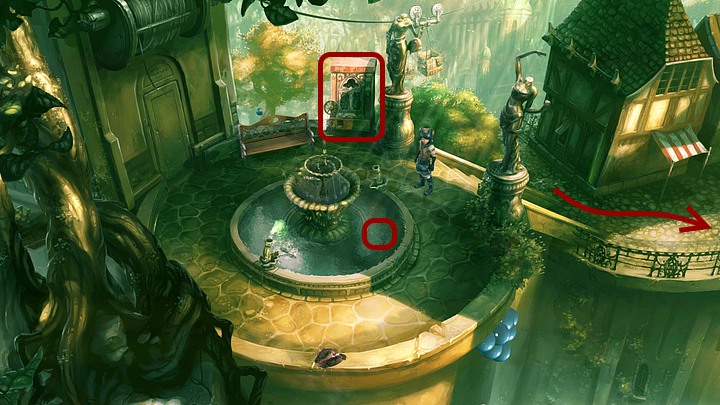
As Sadwick take coins from the well (if you do this ten times, you will get Unfulfilled dreams achievement). Use one of them on the candy vendor to buy lemon drops. Go to the right - deeper into the city.
Come to the great wooden gate - someone will shut it. Knock to the gate - two girls will appear in the windows on the right. Knock again, they will tell you that they want something totally cool for opening the gate. Knock once again, Sadwick will offer money or candies. Girls will agree to take candies, but... Knock once again.
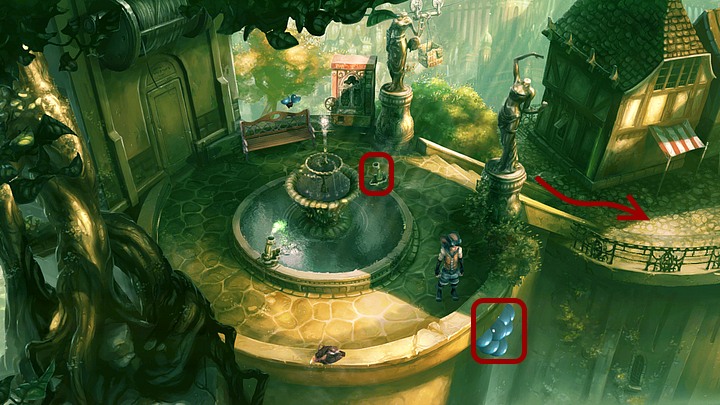
Come back to the well and take a balloon (on the right). Go to the city and click the gate by using balloon. That won't work either.
Go to fountain and through the pipe (the one which is closer to the candy vendor) talk with Renie. Sadwick will ask her what little girls consider as cool, she will say that Lumis. Renie will ask about the bait, Sadwick will give her lemon drops.
Catch naughty Lumis and get shard back
As Renie throw the line with lemon drops as a bait into the well and by dragging the cursor to the right pull three Lumis out. Give them candies as long as they will be calm (if you skip this mini-game and you skipped all before, you will get hidden achievement Done. First!).
Now it's time for Spot who need to take the shard from the boxes, but is afraid of the Seeker.
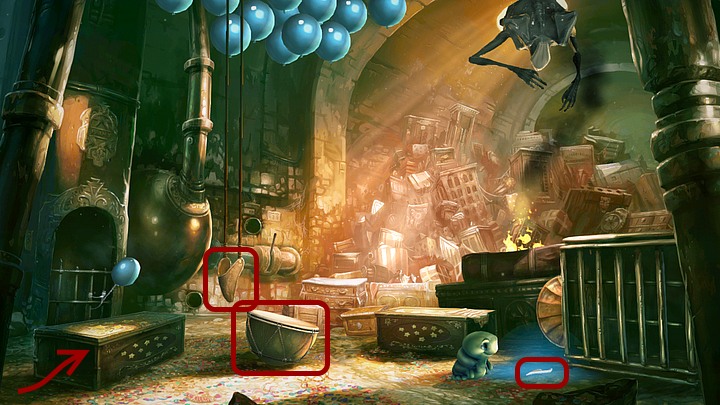
Tip the kettledrum to the right. As usual Spot get into the one of the box of tricks, you will get out by using the box as Blazing Spot. Now click rubber slingshot (move cursor down). Take the shard from the ground (near the cage).
All Lumis will escape from Renie. Go to the canals to catch them.
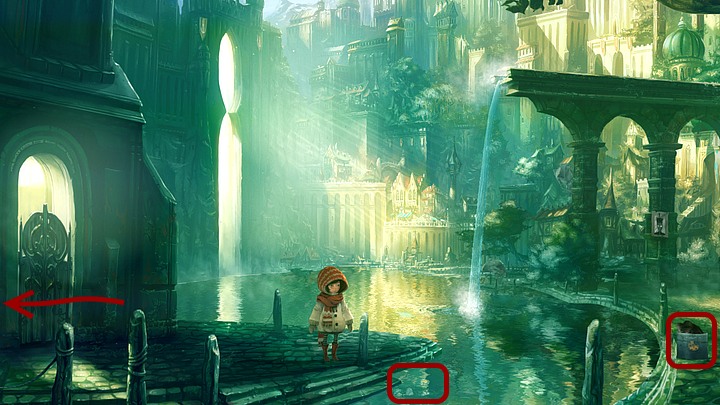
Click bubbles (on the water; near the stairs) - Renie will catch one Lumi, but it runs away quickly. Notice second Lumi in a cookie jar. Use the hook and line to catch it (click Lumi by using the cursor in the shape of line and drag it to the left).
Come back to the market place (if you kick Seeker's bottom and earlier you kick 6 items: TV on the bunker, the carnivorous plant and small skull on swamps; root with flowers near the honey tree, honey tree, wall with prayer mills after Spot go through gate, you will get Let the boot talk achievement), and back to the crash site (to the left). Put the Lumi into broken pipe and go to market place to catch another.
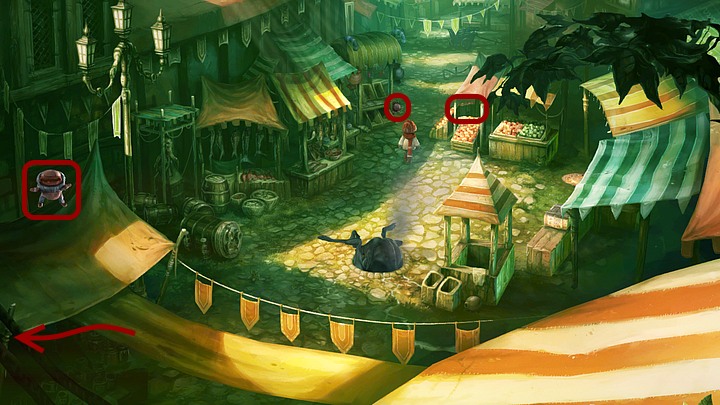
One Lumi is jumping on canvas on the left, try to click it, but it will run away. The second one is hiding behind the candy shop (on the left) - when you try to catch it, it will be moving between the candy shop and the rotten fruit stand (on the right). Come closer, click Lumi (on the right) and quickly move cursor to the left. Click to catch Lumi.
Put this Lumi into the broken pipe. Use the cookie jar (on the right) to won't let them escape once again (click the jar, then the pipe and move cursor up). Lumis will stuck in the pipe.
Get through the gate
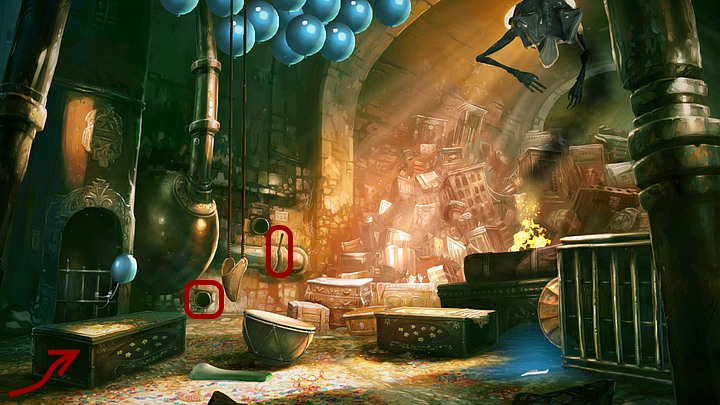
As Spot you need to help to transport Lumis to Sadwick. In a Flat form go through one of the boxes of tricks (no matter which one) to jump from the box as five little Spotties. (If you want to change shape from Blazing or little Spotties just go through one box to another). (If by using boxes you will get 4 Spot forms: normal will change into Blazing, Blazing into Flat, Flat into Five Little Spotties, Five Little Spotties into normal, you will get Mumbo Jumbo achievement). As Spotties go through the hole in the wall (in the background). You will go out by second hole. Move the pump lever down.
When Lumis will jump through the pipe, click them as Sadwick, but they run quickly. (You can also catch third Lumi sitting on the wall, but... you can see by yourself).
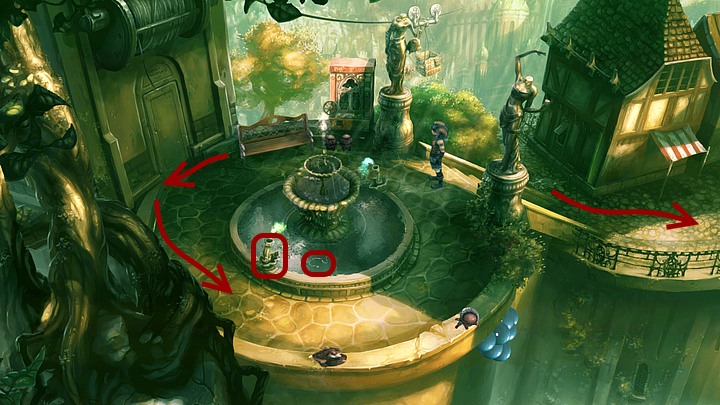
Move the bench to the left and down. Take a hook and line from the fountain. Click the cursor in the shape of the line on the identical symbol (between pipe and bench). Catch both Lumis, go to the city, use Lumis on the gate.
As Renie you get the shard back. Go to the market place and then to the canals. Change Spot into his Balloon form and throw him on the water.
Set sail and choose the right direction
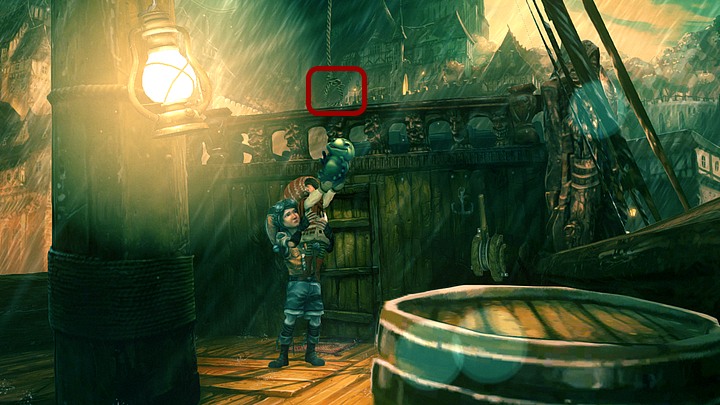
Being on the barge, pull the rope to set sail. Is easier to click the rope when it's moving from the right side to the left.
Unfortunately it appears that the ship is still moored. Move the lever by dragging the cursor down.
After conversation with Kyra (choose whatever option you want) you need to decide: fire the cannon (hidden achievement It's nothing personal) or send Spot at Kyra (hidden achievement It's not easy being green).
If you choose first option, move the gun sight on the gate and click LPM. If you choose second option, change Flat Spot in his usual form and attack Kyra's leg.
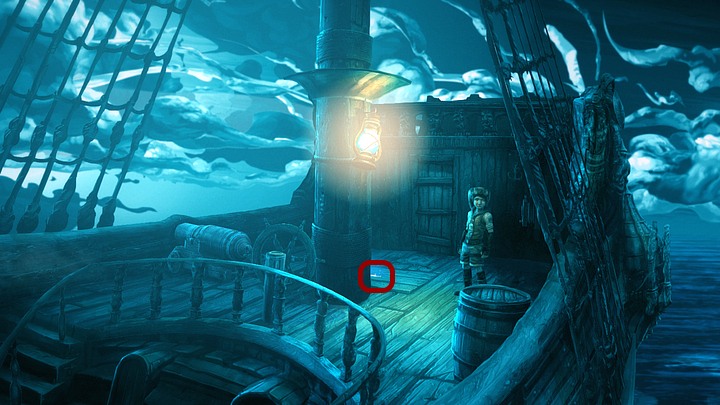
Being on the sea pick up the shard (behind the mast).
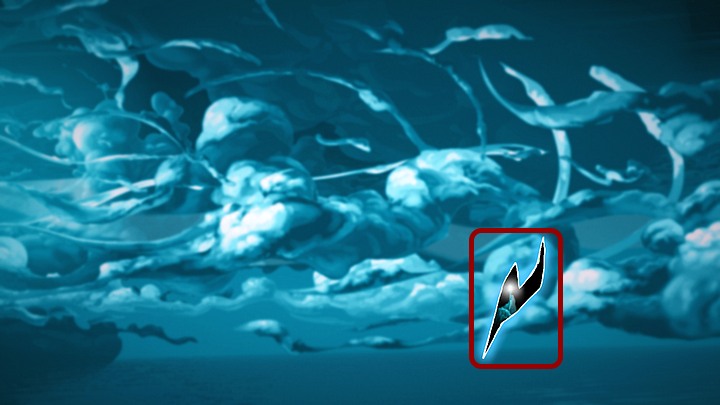
Move the shard on the sky full of clouds. In the bottom on the right side of the screen you will see a lighthouse (click).
When Butterfly Spot will appear and Renie will start to fly (Like a moth in the Wind achievement), try to fly through holes in the clouds that makes Renie faster. When she's flying through fleecy cloud she slows down.
(For ending chapter three, you will get Chapter III achievement).
You are not permitted to copy any image, text or info from this page. This site is not associated with and/or endorsed by the developers and the publishers. All logos and images are copyrighted by their respective owners.
Copyright © 2000 - 2025 Webedia Polska SA for gamepressure.com, unofficial game guides, walkthroughs, secrets, game tips, maps & strategies for top games.
