Legend of Grimrock: Level 3 Pillars of Light
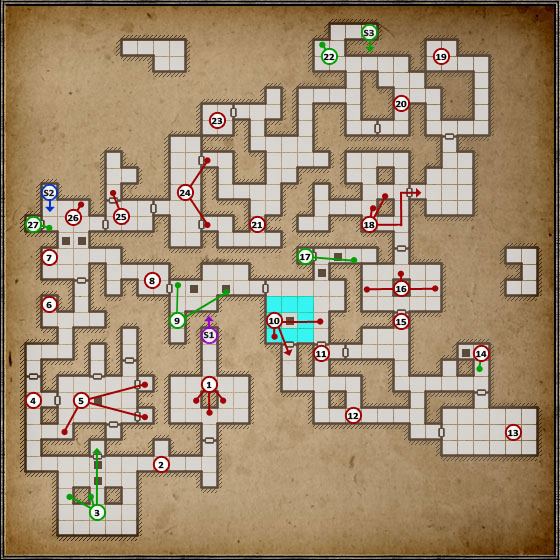
Just like the previous level, the difficulty goes up here as well. By the end, the newly gained alchemy skills will prove very useful and the ability to quickly return to the Crystal of Life in the middle of the underground will save you watching the loading screen quite a bit. All that is caused by poisonous Spiders which inhabit this part of the underground.
 | You will be greeted by a "light" puzzle. In order to open the door found on your way, you need to remove the torch from the wall and instead put three torches into the pillar in the middle of the room. Inside the alcove opposite to the recently opened door you will find the Frost Bomb. |
 | Inside this corridor you will come across a Crowren and additionally a Skeleton Archer with frost arrows will start shooting at you. Quickly get rid of the Crowren and go around the wall (look out not to fall into one of the trap doors, at least not now) to eliminate the Archer. Fighting him is very easy, if only you have some space to avoid his arrows. |
 | Inside this room you will also find the first secret. The wall in the middle has two pillars connected by walls, which can be picked up. For that, you first need to find the rather obvious button on the west side of the wall. After pressing it, one of the walls will raise and uncover a small room with a Shuriken and another button on the opposite wall. 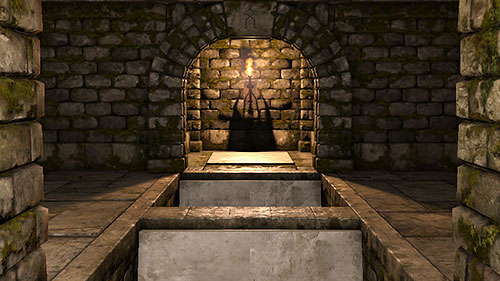 After pressing it, another wall between the pillars will raise, letting you throw an item above two trap doors into the alcove, inside which a grate has also raised. When the item falls down on the other side, the trap doors will lock and you will be able to cross them to the other side to collect the Bow and Arrows - a treasure for your Rogue. That's however still not all. Pick up the item from the pressure plate and jump down to one of the trap doors. You will find yourself inside a corridor with Slimes. Kill them and look around to find a Skull for the minotaur and the Tar Bead. In order to get out of the trap, just pull the lever found there and a teleport which can take you back up will appear. |
 | On the intersection you will notice two doors. The one leading north require a key and the eastern one only pressing a button. Go through the one leading east. |
 | Right after going through the gate, you will have to stand on a pressure plate which will shut the door behind you and cause a few Skeletons to appear. 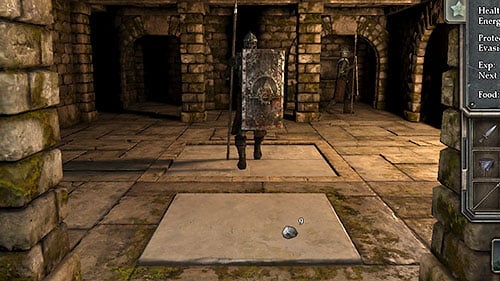 Don't worry, as there's a wonderful way to fight them - in the middle of the room there's a trap door activated by putting an item or just standing on it. All the Skeletons will try to approach you through there, so just throw them down one after another into the underground which you've visited at point (3). In the end you can jump down yourself and eliminate them one after another without the risk of being pinned down, or just leave them there for all eternity (though it's a waste of experience points). You would kill the first with your own weight by jumping onto its head. After dealing with the Skeletons, you will still have to search through all the corridors joining in this room. Inside of them you will find two Tar Beads, a Baked Maggot, Flask, Cave Nettle and what's most important - the Brass Key to the gate from point 4. Now you just have to pull the lever found in the room and return to point (4) by following the newly unlocked passage. |
 | In this alcove you will find the Toorum's Note. It's a story item which gives you hints on going through the underground and a collectible which counts for the end statistics. |
 | By heading further north you will reach the Crystal of Life. Remember this place, as you might have to return here rather often, especially that the Crystal not only replenishes health, but also clears the body of poison. It's much more economical than creating antidotes one after another. Behind the Crystal, on the other side of the trap door you will find stairs leading down onto the next level - unfortunately the road leading to them is still long. If you want, you can jump into one of the trap doors now to find Leather Greaves. |
 | From now on you should expect Spiders everywhere and the first one right behind the corner. Remember that their poison works until the poisoned stands, though it's slow enough for to take an antidote or head back to the Crystal of Life. |
 | Inside the next room with two trap doors you will find a secret - and in fact three. In order to reach it, you have to press the rectangular button on the wall beside the first trap door. It will cause the trap doors to lock for about 5 seconds. In this time you have to quickly press the metal button above the second trap door. Afterwards a corridor with a teleport leading to a secret room will open opposite to the first button. Inside it you will find a Shuriken and the Tome of Health (permanent +25 HP for the character who reads it). 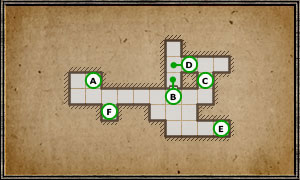 Time for another 2 in 1 secret. After using the teleport to return to the corridor with the trap doors, jump into one of them. In the area where you landed you should find a pressure plate (A). Place any item on it. Stand opposite to the door (B) and put an item on the plate on the other side of the grate. Use the button (C) to activate the teleport behind the grate and place one more item on the plate behind the grate (D). The gate (B) will open and on the other side you will find a Serpent Bracer which gives you protection form poisons (it will come in very handy!). In order to find the secret-in-secret here, press the button once again (C) and return to the re-activated portal where you found the Bracer. You will be taken to a secret alcove (E) inside of which you can find the Scroll of Invisibility. Pull the lever to return to the main room and onto level 3 using the portal (F). Phew... |
 | Inside this room there will be a puzzle with portals which move along the marked light-blue path, following a counter-clockwise pattern. Before the entrance, behind a grate, you will find a useful Rock. 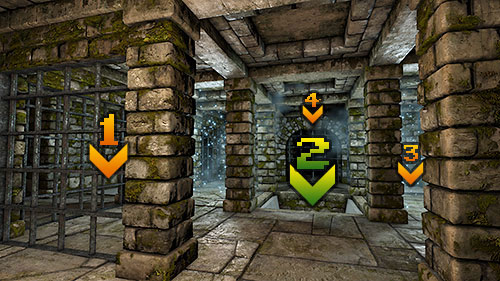 There are two moving portals, divided by three squares. Start off by following one of the portals until you're in a position in which you can throw/shoot something and the pressure plate <1> to cause the trap door to lock <2>. The portals cannot reach you here. Step onto the trap door, take a breath and prepare an item to place on the pressure plate <3> when there's no moving teleport on it. It will open the gate <4> through which you will have to run very quickly, as it will stay open just for a few seconds. |
 | Here you will find a lever which can permanently open you a passage through the "portal" puzzle. Of course the portals unfortunately won't be deactivated, so you still will have to avoid them if you want to head back through here (e.g. to the Crystal of Life). |
 | Here you will come across a collapsed corridor with spider eggs beside it. Destroy them to find more arrows for the Rogue. |
 | Follow the corridors through (11) and (15) to this room, killing spiders on your way. Behind the door opened with a chain there's one of their hatching points, meaning lots of eggs and spiders protecting them. It would be probably best to stay in the door, kill one spider ad a time to close the door in case you need to regenerate/take an antidote/return to the Crystal of Life. After this fight comes to an end, head inside, destroy the eggs and collect the items found inside the room: two Bloodrop Blossoms, Sandmole Hide Vest, Loincloth, Longsword and what's most important - the Iron Key needed for the door at point (15). Now pull the lever beside the locked door in the north and move onwards. |
 | This place is at the same time a puzzle needed to move on and a small secret. Place anything "as sacrifice" on the pressure plate and press the brass button by the grates. In return, a second Iron Key, Silk Hose and the item that you placed as sacrifice. Now, in order to receive the secret present, place the Hose that you have just received as sacrifice and in return you will get the Nomad Mittens (and the Hose as well, clean and unused). |
 | Having both Iron Keys, you will be able to open the locks by the door and move to the next puzzle. |
 | At this spot there's a pillar similar to the one at point (1). The puzzle itself is similar as well, but works the other way round and instead of placing torches on the pillar, you need to place two into the walls around and the very last into the pillar itself, from the side of the locked door. However before you place the torch on the pillar, note that after you place two torches on the walls, a secret passage connected with another secret will open up. After paying a visit to the Iron Door, place the third torch into the handle on the pillar. |
 | 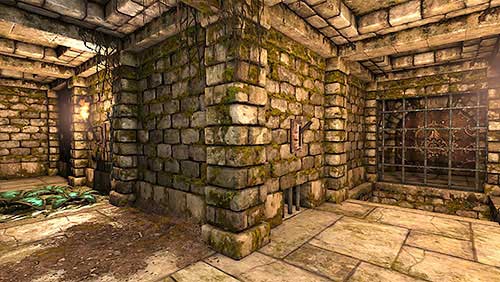 Now, that you have opened the secret tunnel, inside of it you should find a lever which will open the Iron Door found nearby the room with the moving portals. In order to reach them, you need to return there (10) and take the weight off the pressure plate in the west. You will therefore lock the trap door which prevented you from approaching the door before. Inside you will find the Huntsman Cloak and beside the door itself a Nettle. |
 | Just like with other puzzles on this level, you will not only have to be clever here, but also fast. Start off by pressing the rectangular, stone button on the northern side of the first pillar. It will open a shortcut needed to move on and free one Spider. Afterwards press the small metal button on the western side of the same pillar and quickly run to the gate which will open for a few second, following the path marked on the map. On the other side of the gate there will be a metal button which opens them permanently. |
 | Here you will find another "pantry", with a Boiled Beetle and Grim Cap on the floor. |
 | In the spot marked on the map, there are Leather Gloves lying on the floor and a group of Spiders roaming beside. |
 | On the floor beneath the torch you will find another Toorum's Note which warns you of the Spiders. At this moment you should head the sound of an opening door. A secret has opened just now (22), but more on that further on. Start off by collecting the Round Shield found behind the corner, to the south. |
 | Now return back to around point 20. A couple Spiders came out of the unlocked secret area, including one which has a key to a secret at the end of the level - Gold Key. Look for it after killing each one of them. After reaching the room itself (22), collect the Tar Beads found there and look around the nearby wall for a hidden button which opens a passage to a set of stairs (S3) leading into an isolated area of the underground. More on that in the description of Level 4. |
 | In the nook just east of this room there's a Grim Cap. Inside the room itself you can find a Wooden Box with some alchemy ingredients, Scroll of Shock, Fire Bomb and a Mole Jerky. Apart from that you will also find an unfinished alchemy recipe for the Sulphurous Potion. The ingredients are, Blood Drop Blossom and the last, unlisted one is the Cave Nettle. |
 | Behind the two grates you will find another Spider hatchery. Proceed just like in points 13. Open the gate, kill one Spider and close again to regenerate. I'd suggest using this tactic by the northern door. After killing all the Spiders, you will find one Nettle by the eggs. |
 | In order to open the door here, you will have to solve an easy puzzle. By the door there's a hole into which the energy sphere spitted by the statue found inside the corridor, behind grates, must fall. When you stand on the pressure plate before the grate, the statue will spit a sphere. In order to raise the grates and let the sphere reach the destination, you will need to place something on the plate and step sideways. When the grate opens, you will be able to enter the corridor behind the statue to find a Baked Maggot. |
 | On the other side of the freshly opened door you will find yourself in the well-known room with the Crystal of Life, though on the other side of the trap door. In order to open the passage between the two parts of the room you just need to pull the nearby lever. Here you will also find a Leather Cap and another Toorum's Note. |
 | You still have one thing to do on this level. Right beside the stairs there's a door with a golden lock. Open it using the Golden Key which you have found by the corpse of one of the Spiders nearby the secret at point 22. Inside the room you will find the Knoffer Mace and Ring Boots. |
 | Return to level 2. |
 | Descent to level 4. |
 | Descent to the secret part of level 4. |
- Legend of Grimrock Game Guide & Walkthrough
- Legend of Grimrock: Walkthrough
- Legend of Grimrock: Legend
- Legend of Grimrock: Level 1 Into The Dark
- Legend of Grimrock: Level 2 Old Tunnels
- Legend of Grimrock: Level 3 Pillars of Light
- Legend of Grimrock: Level 4 Archives
- Legend of Grimrock: Level 5 Hallways
- Legend of Grimrock: Level 6 Trapped
- Legend of Grimrock: Level 7 Ancient Chambers
- Legend of Grimrock: Level 8 The Vault
- Legend of Grimrock: Level 9 Goromorg Temple I
- Legend of Grimrock: Level 10 Goromorg Temple II
- Legend of Grimrock: Levels 11-13 The Tomb, The Prison, The Cemetery
- Legend of Grimrock: Walkthrough
You are not permitted to copy any image, text or info from this page. This site is not associated with and/or endorsed by the developers and the publishers. All logos and images are copyrighted by their respective owners.
Copyright © 2000 - 2026 Webedia Polska SA for gamepressure.com, unofficial game guides, walkthroughs, secrets, game tips, maps & strategies for top games.
