Hello Neighbor: Mods - how to install?
The following page contains instructions on how to install mods for Hello Neighbor. Here, you can learn how to use Hello Neighbor Mod Kit.
Installing Unreal Engine 4
Install Unreal Engine 4 tool before you decide to install any mods for the game. Follow these steps:
- Register on Epic Games (you can skip this part if you already have an account).
- Download Unreal Engine 4 from this page.
- Install Unreal Engine 4 and then run it.
Installing Hello Neighbor Mod Kit
Unreal Engine 4 is running. Now, it is time to install Hello Neighbor Mod Kit.

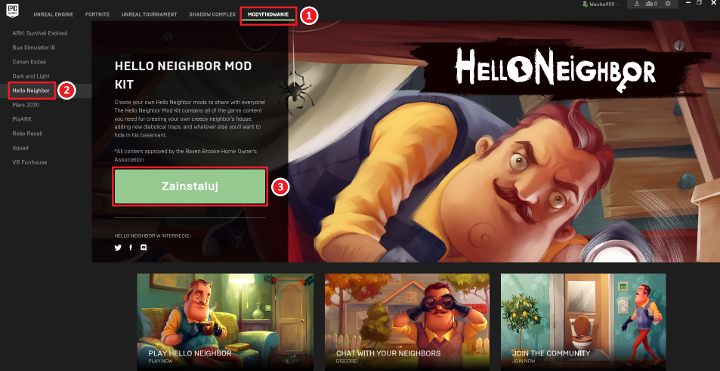
You will see the window presented above. Now, complete the following steps:
- Click the "Modding" icon.
- Select Hello Neighbor (on the left).
- Click the green button to "Install". Choose the directory on your drive (where you want to install the tool).
Installing and activating the mods
Once Hello Neighbor Mod Kit is installed, the green "Install" button will turn into "Run". To install a mod you have to:
- Download a modification.
- Unpack the content into: C:\Program Files\Epic Games\HelloDevKit\HelloNeighbor\Plugins (the default directory).
- Run Hello Neighbor Mod Kit.

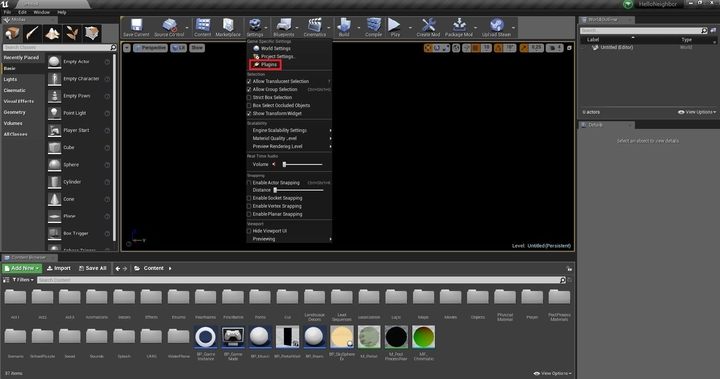
- Go to the "Settings" tab and open "Plugins" window.
- You can see the window with modifications (and other files) detected by the tool kit. Find the modification you want to play and be sure that the "Enabled" button is activated.

- Now, go to the bottom part of the main window. There, you can see all files and folders of Hello Neighbor. To run a mod you need to open the following folders: Maps -> "Mod's name" -> Content -> Maps.
- Here, you can find a file - usually, its name should be the same as the installed mod. Click twice on this file to run the mod.
- Hello Neighbor Game Guide
- Hello Neighbor: Game Guide
- Hello Neighbor: Best mods
- Hello Neighbor: Best mods - list
- Hello Neighbor: Mods - how to install?
- Hello Neighbor: Hello Granny mod guide
- Hello Neighbor: 13 Floors The Full Chapter mod guide
- Hello Neighbor: BrotherTale mod guide
- Hello Neighbor: Hello Neighbor Alpha 2 Remake mod guide
- Hello Neighbor: Real Life House Remake mod guide
- Hello Neighbor: Hello Forest mod guide
- Hello Neighbor: The Final Escape mod guide
- Hello Neighbor: Inside mod guide
- Hello Neighbor: Hello Neighbor Snowed In! mod guide
- Hello Neighbor: Hello SCP 173 Neighbor mod guide
- Hello Neighbor: Best mods
- Hello Neighbor: Game Guide
You are not permitted to copy any image, text or info from this page. This site is not associated with and/or endorsed by the developers and the publishers. All logos and images are copyrighted by their respective owners.
Copyright © 2000 - 2025 Webedia Polska SA for gamepressure.com, unofficial game guides, walkthroughs, secrets, game tips, maps & strategies for top games.
