Battlestations Midway: Turning Point at Midway
 | Units at your disposal: two airfields, the shipyard, fighters, torpedo planes, dive bombers, level bombers B-17, seaplanes Catalina, two patrol boats, later - aircraft carrier with his planes and two destroyers Enemy: two aircraft carriers, 5 destroyers, 4 cargo ships, landing boats, fighters, torpedo planes and bombers Level of difficulty: 5 |
Primary objectives:
- Repel the air raid (1)
- Destroy the transport ships (2)
- Locate and destroy the Japanese carriers (3)
- "Yorktown" must survive (4)
Hidden objective:
- ? (*)
- Navy Distinguished Service Medal
Potential medals to earn:

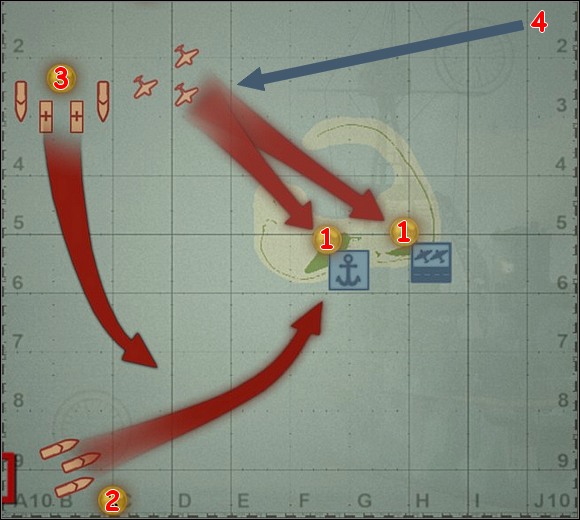
Recon seaplane Catalina will detect many Japanese aircrafts heading towards the Midway from north-west. [#1] Your first task after starting the game will be to repel this enemy air raid (1) pointed against your shipyard and both airfields situated on the island. Immediately switch to first of these airfields and take-off with 4 flights (3 planes in each) of fighters armed already with bombs. When they're in the air direct them against incoming enemy aircrafts. [#2] Try to intercept them as far from your installations on Midway as you can.
![[ 1] - Turning Point at Midway - Singleplayer Campaign - Battlestations: Midway - Game Guide and Walkthrough](/battlestationsmidway/gfx/word/523099609.jpg) [ 1]
| ![[ 2] - Turning Point at Midway - Singleplayer Campaign - Battlestations: Midway - Game Guide and Walkthrough](/battlestationsmidway/gfx/word/523099625.jpg) [ 2]
|
On 2nd airfield only level bombers B-17s are stationing - also order them to take-off in case of enemy airplanes have managed to bombard this airfield, because your bombers won't start off from the destroyed airstrip of course and it's better to have them in the air already. [#3] Send B-17s south-west at first, in the direction of point (2), where you later (after repelling the enemy air raid) see Japanese transport ships. You can wait there for those cargo ships with your B-17s level bombers, but I'd suggest to direct them further to the north, because in the location marked on my map with (3) you will find soon more important targets, I think - namely: the Japanese aircraft carriers. You're taking roundabout way (route) to keep at a distance from enemy planes, especially "Zero" fighters. You can eventually escort your bombers with a flight of "Wildcats" (choose such an incomplete one). Simultaneously, right at the beginning of a mission, you should switch to the shipyard and launch two Elco-class patrol boats. Send both south-west from the island, to the (2) location, with a task of preparing a warm welcome ceremony for enemy transport ships you'll see there in the latter phase of a gameplay. Of course your fighters shoot down all the time the Japanese planes approaching over the island. Don't pursue the enemy which has managed to drop his bombs, better concentrate on these enemies that are approaching in a given moment and still have their deadly cargo, because they can damage your airfield yet. [#4]
![[3] - Turning Point at Midway - Singleplayer Campaign - Battlestations: Midway - Game Guide and Walkthrough](/battlestationsmidway/gfx/word/523099640.jpg) [3]
| ![[4] - Turning Point at Midway - Singleplayer Campaign - Battlestations: Midway - Game Guide and Walkthrough](/battlestationsmidway/gfx/word/523099656.jpg) [4]
|
Finally you'll repel this first air strike. However, after a moment you'll see this long-awaited Japanese cargo ships convoy, heading to the island from south-west direction. This convoy consists of few transport ships in the escort of two destroyers. Your next task is to sink the Japanese transport ships (2), all of them. [#5] If you have followed my instructions then two your PT boats of Elco-type already wait for these Japanese. Try to send to the bottom these two destroyers first, by sailing as close as possible to them and launching two torpedos at the boards of each of them. This could be a challenge for you because of heavy AA fire of enemy ships defending themselves, but believe me: this task is doable. Fire rest of your torpedos into the boards (sides) of cargo ships - two torpedos should sink each of these ships. [#6]
![[5] - Turning Point at Midway - Singleplayer Campaign - Battlestations: Midway - Game Guide and Walkthrough](/battlestationsmidway/gfx/word/523099671.jpg) [5]
| ![[6] - Turning Point at Midway - Singleplayer Campaign - Battlestations: Midway - Game Guide and Walkthrough](/battlestationsmidway/gfx/word/523099687.jpg) [6]
|
However, if your PT boats screwed up their job, you can also attack enemy ships with your "Wildcat" fighters armed additionally with bombs - use bombs against destroyers, though, because cargo ships can be destroyed even with machineguns fire (strafe their decks). Or, if the shipyard still functions, you can possibly send here two Catalina seaplanes with torpedos to finish off these enemy destroyers. Destroy all transport ships (2) using the "Wildcats", as I mentioned, and their machineguns or bombs, if you still have some. When diving towards the target and shooting at him, decrease your airspeed and try to stay as long as possible over him, because now you need many bullets to sink him - these aren't such a weak cargo ships as you've played against earlier. In some moment the Japanese transports will start launching small landing boats fully loaded with troops wishing to get to the island of Midway. Quickly destroy these boats strafing them with your "Wildcats" (if you still have patrol boats they are also good in burning these enemy units), but remember that the boats appear until you sink mother-ships, I mean transports. [#7] So focus on cargo ships. After sending to the bottom all Japanese ships in this area (2) you will see next enemy in place marked with (3) on my map: two aircraft carriers escorted by three destroyers. These forces also sail towards your Midway. [#8]
![[7] - Turning Point at Midway - Singleplayer Campaign - Battlestations: Midway - Game Guide and Walkthrough](/battlestationsmidway/gfx/word/523099703.jpg) [7]
| ![[8] - Turning Point at Midway - Singleplayer Campaign - Battlestations: Midway - Game Guide and Walkthrough](/battlestationsmidway/gfx/word/523099718.jpg) [8]
|
You must localize and destroy this Japanese flotilla (3) as if, but you should already have B-17s bombers flying over these enemy warships. You've sent these bombers here earlier, remember? So use them now and bombard enemy carriers by attacking them in their longitudinal axis. Probably it's best to concentrate only on one of "floating airfields": three flights of B-17s (max. number of these aircrafts in the air in one moment) can sink one carrier (if they'll manage to hit it with their bombs). And, in consequence of their bombardment, you will have to face smaller numbers of enemy planes later. [#9] I'm really not sure if these three flights of B-17 can sink both carriers at once... You should also assemble in this area your fighters launched from the airfield on Midway to shoot down at the earliest all enemy aircrafts taking off from the carriers and heading towards the island again. At the same time you'll also see an American aircraft carrier USS "Yorktown" (in company of two destroyers), entering the map in its north-east corner. [#10] Thereupon the Japanese will send towards the American flotilla their own planes launched from the carriers (or the only one now ;-). You must be conscious that "Yorktown" must survive this battle (4).
![[9] - Turning Point at Midway - Singleplayer Campaign - Battlestations: Midway - Game Guide and Walkthrough](/battlestationsmidway/gfx/word/523099734.jpg) [9]
| ![[10] - Turning Point at Midway - Singleplayer Campaign - Battlestations: Midway - Game Guide and Walkthrough](/battlestationsmidway/gfx/word/523099750.jpg) [10]
|
Switch to him immediately and take-off from his flight deck with three flights of "Wildcat" fighters armed with bombs. Direct them to the fight with enemy planes - together with your other aircrafts from Midway island. Simultaneously send the trio of "Avenger" torpedo planes towards the enemy destroyers escorting the Japanese carrier/s. Check if you can send similar trio from the airfield located on the island. Attack with them enemy destroyers (or one of them - depends on how many torpedo bombers you have in the air). Guide also your own destroyers (from the escort of "Yorktown") south-west with a task of engaging the enemy warships. The "Yorktown" himself can slightly change his course to the left (but stick to south-west direction all the time) to cut in the course of enemy flotilla trying to circumnavigate the Midway from south. [#11] Try to sink one after one all Japanese destroyers escorting the carrier/s with your "Avengers" sent off from time to time and their torpedos. Maybe before your own warships will get to this area these Japanese will be kissing the bottom of an ocean since a long time. [#12] But even if they still stand on their foots when you're there with your destroyers, they shouldn't present a problem and danger, weakened by your aerial attacks. However, remember to not send to many "Avengers" against the enemy destroyers because you should have a great number of fighters in the air all the time: 2 flights of torpedo planes (3 aircrafts in each flight) it's good idea for now, it's enough.
![[11] - Turning Point at Midway - Singleplayer Campaign - Battlestations: Midway - Game Guide and Walkthrough](/battlestationsmidway/gfx/word/523099765.jpg) [11]
| ![[12] - Turning Point at Midway - Singleplayer Campaign - Battlestations: Midway - Game Guide and Walkthrough](/battlestationsmidway/gfx/word/523099781.jpg) [12]
|
When your own destroyers have managed to reach the Japanese carriers finally you only have to finish the mission by sinking the enemy (3). Fire at him a salvo of torpedos, shell him with arty. [#13] Now you can also send here more "Avengers" armed with torpedos (a squadron or two, 5 planes in each) to finish off the job. Unfortunately the "Yorktown" will be attacked and heavily damaged by the enemy once again (you can't prevent that aggression), then scenario will end. [#14]
![[13] - Turning Point at Midway - Singleplayer Campaign - Battlestations: Midway - Game Guide and Walkthrough](/battlestationsmidway/gfx/word/523099796.jpg) [13]
| ![[14] - Turning Point at Midway - Singleplayer Campaign - Battlestations: Midway - Game Guide and Walkthrough](/battlestationsmidway/gfx/word/523099812.jpg) [14]
|
- Battlestations: Midway Game Guide
- Battlestations Midway: Game Guide
- Battlestations Midway: Singleplayer Campaign
- Battlestations Midway: Stationed at Pearl
- Battlestations Midway: Defense of the Philippines
- Battlestations Midway: Running the Palawan Passage
- Battlestations Midway: Vengeance at Luzon
- Battlestations Midway: Raid on Balikpapan
- Battlestations Midway: Holding the Lombok Strait
- Battlestations Midway: Rendezvous in the Java Sea
- Battlestations Midway: Strike on Tulagi
- Battlestations Midway: Battle of the Coral Sea
- Battlestations Midway: Turning Point at Midway
- Battlestations Midway: Endgame at Midway
- Battlestations Midway: Singleplayer Campaign
- Battlestations Midway: Game Guide
You are not permitted to copy any image, text or info from this page. This site is not associated with and/or endorsed by the developers and the publishers. All logos and images are copyrighted by their respective owners.
Copyright © 2000 - 2025 Webedia Polska SA for gamepressure.com, unofficial game guides, walkthroughs, secrets, game tips, maps & strategies for top games.
