Battlestations Midway: Attack on Force Z
 | Units at your disposal: two airfields, many fighters, torpedo planes and bombers Enemy: two British battleships, aircraft carrier, two destroyers and many of fighter planes Level of difficulty: 5 (4 with hidden objective) |
Primary objective:
- Destroy the "Prince of Wales" and the "Repulse" (*)
- Destroy the Allied carrier (*)
Hidden objective:

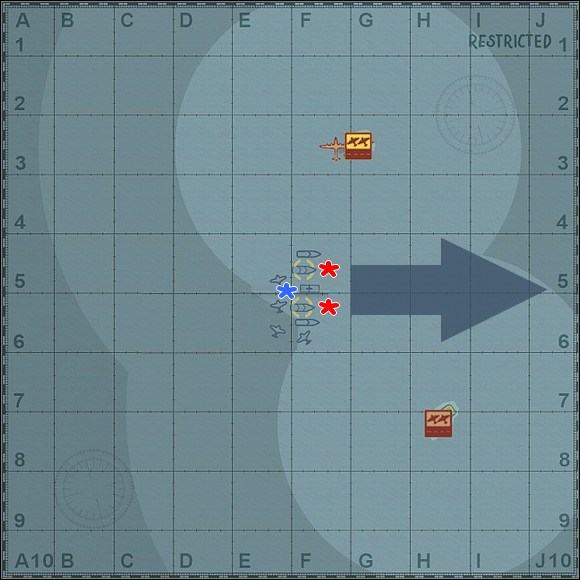
This scenario is easier to finish successfully if you will focus at first on enemy aircraft carrier sailing between both allied battleships and sink him quickly (*), completing hidden objective by the way. In consequence he will stop launching his "Hurricane" fighter planes (he's heading to the bottom at last, right?) and you will have more space in the air. So immediately take-off with bombers G3M "Nell" from both of your airfields located on the islands (northern and southern). Launch four flights of these planes (3 aircrafts in each) from every airfield - all your bombers should be armed with six 250kg bombs each. [#1] Don't bother about fighter escort for them, as a matter of fact you can forget about Japanese fighter planes in this mission, they're useless. Systematically direct all flights - just after the take-off of each of them - to the point situated in front of enemy flotilla (which sails to the east with an intention of leaving the map). When you have most of your planes in that point order them to bombard enemy carrier by attacking him in his longitudinal axis. [#2]
![[ 1] - Attack on Force Z - Plane Challenges - Battlestations: Midway - Game Guide and Walkthrough](/battlestationsmidway/gfx/word/523775578.jpg) [ 1]
| ![[ 2] - Attack on Force Z - Plane Challenges - Battlestations: Midway - Game Guide and Walkthrough](/battlestationsmidway/gfx/word/523775593.jpg) [ 2]
|
Your level bombers drop their bombs from a high altitude and even when they're taking heavy losses in consequence of enemy AA fire and during the battle with enemy fighters, they should be able to sink allied carrier in this first air raid. [#3] Then they'll start returning to the bases. Don't worry about pursuing British fighter planes - bombers' crews will probably shoot down some of them or many of these fighters will be destroyed over the islands by Japanese AA artillery. Maybe even all of them. However, if any of your flights consists now of only one bomber don't bother returning home with this flight - just crash him into the ocean or into the one of British warships. And immediately take-off with next planes (you should have this opportunity after such a kamikadze action). Now you need G4M "Betty" planes armed (all of them) with torpedos. These aircrafts are better than previous in performing torpedo attacks because they're smaller (so more difficult to hit) and they have greater maneuverability than G3M "Nell" bombers. [#4]
![[3] - Attack on Force Z - Plane Challenges - Battlestations: Midway - Game Guide and Walkthrough](/battlestationsmidway/gfx/word/523775609.jpg) [3]
| ![[4] - Attack on Force Z - Plane Challenges - Battlestations: Midway - Game Guide and Walkthrough](/battlestationsmidway/gfx/word/523775625.jpg) [4]
|
After the take-off also gather them in places where they should wait till you have many of them there, but this time assign these places on both sides of the Allied flotilla and a little bit in front of it. However, don't assemble them too close to the enemy to avoid getting with them under AA fire. The purpose of this whole operation is to assemble a great number of planes and attack the enemy with all of them simultaneously to not let him shoot down every plane. Focus on enemy battleships and attack them from sides - try to concentrate on the "Repulse" which has closer to the edge of a map. [#5] When you personally lead one of the attacks additionally crash into the enemy warship just after releasing the torpedo - turn yourself into "kamikadze". [#6] Immediately take-off with next planes from both of your airfields, especially from this on south (you have closer to the target from there). You should hunt down 2nd of enemy battleships just at the edge of a map. And when they're both heading to the coral (*) mission ends successfully.
![[5] - Attack on Force Z - Plane Challenges - Battlestations: Midway - Game Guide and Walkthrough](/battlestationsmidway/gfx/word/523775640.jpg) [5]
| ![[6] - Attack on Force Z - Plane Challenges - Battlestations: Midway - Game Guide and Walkthrough](/battlestationsmidway/gfx/word/523775656.jpg) [6]
|
You are not permitted to copy any image, text or info from this page. This site is not associated with and/or endorsed by the developers and the publishers. All logos and images are copyrighted by their respective owners.
Copyright © 2000 - 2025 Webedia Polska SA for gamepressure.com, unofficial game guides, walkthroughs, secrets, game tips, maps & strategies for top games.
