Preparing to battle | Gameplay

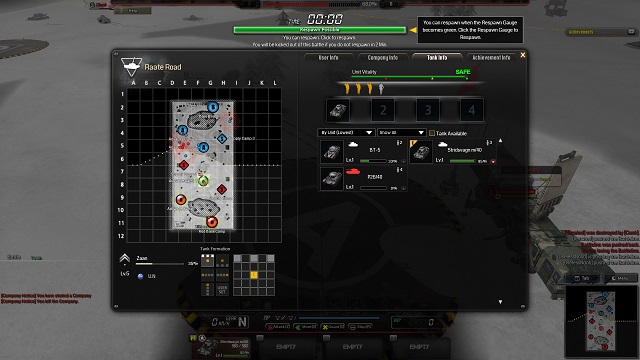
The first view that we see after joining the battle is the preparation screen, which consist of four separate tabs and a map of the battlefield. The map not only shows us the shape of the terrain, but also all the Camps and who currently owns them, the position of the Battle Line and your allies (along with what is in their range of view). We can mark the Camp that we want to respawn in on the map (as long as we own at least two Camps), but we have to remember that not all the points provide such an option (look only at Advance Camps). Below the map, we can view information about our profile - our current level, rank and the amount of experience that we have to earn to advance. Moreover, right next to the profile information, we can see the types of battle formation, which we can use when having more units. The tabs in the menu are as follows:
1. User info
All the important information about the players participating in the battle, both our allies and enemies - their nicknames, ranks, team, current status and statistics.
2. Company info
In this tab, we can create our own company, strictly speaking - our small team from some of the players that fight on our side. Constructing such a party is quite easy. First, we have to click the appropriate icon near the name of our user and then invite other people in similar way. This team of players allows us to act in a more organized way, especially when we have a specific group of people in our company (we can make the company open or set the necessity of invitation). We have to realize two important things - firstly, we are talking about a company of real players, not a group of your own machines, which are a totally different aspect. Secondly, such a party can be organized only during a specific battle - not as a permanent guild or an official clan.
3. Tank info
This is basically the most important element of the whole panel. Using this tab, right after beginning the game (or after being killed), we can prepare ourselves for the battles. To proceed to the battlefield, we first have to choose a specific tank (or tanks) from the list that we want to lead to victory. They vary from one another with their levels, statistics, destination and - what's most important - the number of required crew members. Above the list, we can see four empty slots, which theoretically can all be filled with tanks. However, a little higher, there are icons of soldiers. The more there is of them (we unlock more with the game progress), the more tanks we can use. When we have for example six soldiers, we can choose two tanks that require three soldiers each, but also one stronger tank that requires four soldiers and one weaker, in which only two of them are necessary. This aspect is not so difficult as it seems. There are two more important things to know about this panel. Firstly, when a tank is destroy, it has to be repaired during the game and it cannot be used for some time, unless we have special items that allow us to fix it instantly. Therefore, it is good to always have some other machines to use or the items that allows you to fix the tank. Secondly, when you're killed, a timer activates showing you how much time you have to wait until respawn. The respawning time depends mainly on the number of strategic points owned by the team, but only of one type - Supply Camps. Advance Camps are for other purposes. We will talk about this more in the later chapters.
4. Achievement info
The last panel shows the achievements that you've partially unlocked and can soon be fully completed. Thanks to that, you can learn what you still have to do to earn a given achievement.
You are not permitted to copy any image, text or info from this page. This site is not associated with and/or endorsed by the Bandai Namco Entertainment or Creant Studios. All logos and images are copyrighted by their respective owners.
Copyright © 2000 - 2025 Webedia Polska SA for gamepressure.com, unofficial game guides, walkthroughs, secrets, game tips, maps & strategies for top games.
