Battlefield Bad Company: Harvest Day

Map construction
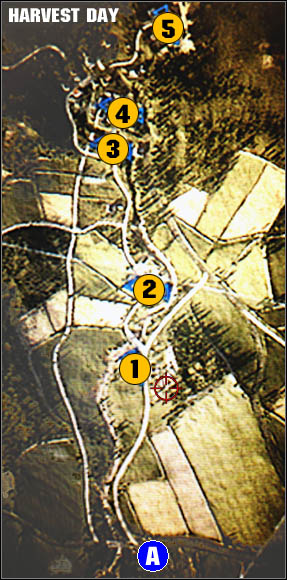
This map is actually a one huge hill with the hilltop located in the place, where the last pair of gold crates is located. During the struggles for pairs [1], [2] and [3], players are often fighting on long distances with the usage of sniper rifles, assault rifles and rocket launchers. Heavy machinery also actively participates in these fights. A lot of various defensive weapons (like stationary anti-tank weapons and grenade launchers) can serve well, until they're destroyed by an artillery strike. After that, the only thing left for the defender is using vehicles and fighting on foot.
The fight for the point [4] takes place in a small town, where heavy and assault rifles dominate massively. Vehicles are no longer as active as before, but the attackers should keep them running, in order to launch a swift attack on the point [5], just after eliminating the fourth pair of gold crates. Moreover, from the town's buildings You can watch other structures, as well as the gold, so it is important to find as good vantage point as possible. It really helps the defenders in completing their task, but on the other hand, it creates a great occasion for the attackers to sneak up to the shooters and stab them.
Also, notice that I put a vantage point indicator near the point [1] on the map above. I think only the Demolition class can use it; there's a quite high hill, with a forest on top and slopes. From there, the defenders can watch enemy vehicles coming from the south. What is more, it that location You can find a lot of defensive stationary weapons - keep an eye on this place.
Using cars, in the fight as well as for transport, is quite difficult here. The infantry here is prepared for fighting tanks and that means they can deal with small infantry vehicles in no time.
This map is quite one-sided - the defenders are usually winning here.
The most common plays
Mines, mines, mines and yet more mines, especially at the beginning of the game. During the fight for the first pair of gold grates, heavy vehicles are very active and their paths can be easily anticipated. That creates a great occasion to set some explosives.
If You're playing for the attackers, forget about rushing with a tank. The enemies will see You long before You reach the first pair of gold crates, so they'll prepare their rocket launchers and keep waiting for You. The infantry should attack first - artillery, snipers and precise bombardments should effectively make the resistance weaker. After that, bring some tanks to the battle - they'll finish the job and eliminate the gold crates.
On this map, most of the gold crates is easily accessible for the vehicles. That means, tanks can use their cannons to destroy them. So, the defenders cannot let the tanks to get close to the gold, and the attackers must simply eliminate the defenders.
The last three pairs of gold crates are connected with almost entirely infantry work. As I mentioned above, shooting from the windows and using weapons on short and medium distance (shotguns, assault rifles) should help in here. Assault and Support kits should dominate in the town, as these classes have appropriate weaponry and the ability of healing. Few soldiers with rocket launchers can be useful too, just in case a tank show up.
The bridge between the points [2] and [3] can be destroyed, but this will stop the attackers only for a short moment. Better consider - as a defender - destroying the bridge between crates [3] and [4]. This'll seriously make enemy vehicles' job a lot more difficult.
- Battlefield: Bad Company Game Guide
- Battlefield Bad Company: Game Guide
- Battlefield Bad Company: Gold Rush mode assumptions
- Battlefield Bad Company: Basics
- Battlefield Bad Company: Ascension
- Battlefield Bad Company: Deconstruction
- Battlefield Bad Company: End of the Line
- Battlefield Bad Company: Final Ignition
- Battlefield Bad Company: Harvest Day
- Battlefield Bad Company: Oasis
- Battlefield Bad Company: Over and Out
- Battlefield Bad Company: Valley Run
- Battlefield Bad Company: Kits
- Battlefield Bad Company: Vehicles
- Battlefield Bad Company: Stationary weapons
- Battlefield Bad Company: Additional notes
- Battlefield Bad Company: Achievements
- Battlefield Bad Company: Gold Rush mode assumptions
- Battlefield Bad Company: Game Guide
You are not permitted to copy any image, text or info from this page. This site is not associated with and/or endorsed by the developers and the publishers. All logos and images are copyrighted by their respective owners.
Copyright © 2000 - 2026 Webedia Polska SA for gamepressure.com, unofficial game guides, walkthroughs, secrets, game tips, maps & strategies for top games.
