The Silver Mine Writhes | Main missions | NiOh
Last update:
This section of NiOh game guide includes the thorough walkthrough description of The Silver Mine Writhes main quest, which involves removing the fog and comes with the option to unlock one of the useful shortcuts.
The beginning of the mission
Walk towards the Shrine after the mission starts. You can easily notice that there is no Kodama near it. It is so because you must find them separately for each region. The location of all spirits can be found further in this chapter.
You can go in two directions from the starting point. If you go down, you will see a wall of poisonous fog. This is the path that will allow you to complete the mission, so your first objective is to get rid of the fog. Go directly to the second corridor.
Removing the fog
![You will see a dweller [1] in front of you - you can be seen on the picture above - The Silver Mine Writhes | Main missions | NiOh - Main missions - NiOh Game Guide](/nioh/gfx/word/430874312.jpg)
You will see a dweller [1] in front of you - you can be seen on the picture above. If you try walking towards him, the bridge will collapse (it is already collapsed on the screenshot). Below you will encounter another opponent and more poisonous fog. If you fall, you can return up by using the ladder [2] shown on the picture. In order to continue the mission you must use the scaffolding on the right [3]. At its end, on the right, there is another dweller, so don't rush too quickly towards the treasure - the opponent can throw you down if you're not careful.

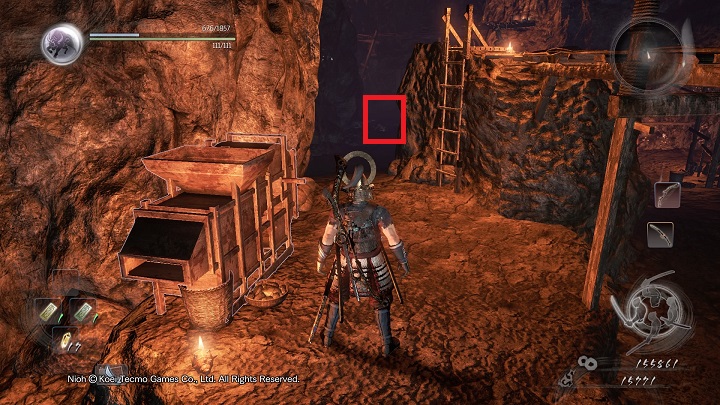
Walk around the fog and reach the place where the dweller was standing. Use the machine shown on the picture[1]. In the corridor on the right [2] there are four dwellers. What's important, the disappearance of the poison caused by the machine lasts for about one minute. After that time the fog will appear in the area. Jump down after using the machine. Defeat the encountered enemies and focus on the rock-like object which generates the poison. Destroying it requires a few hits, but the effect will be permanent. You must destroy the object with a fast combination since it regenerates very quickly.

Near the place with the "stone" you will find a Kodama that will join your Shrine. Explore the lower corridors and get up. Your target is the area behind the corridor with the four dwellers.

If you go right, in the dead end you will encounter a dweller and you will find a door that cannot be opened yet. Go left. Walk through the scaffolding and jump on the dweller next to the machine. The stone is located in the place shown on the picture. In the area you will encounter two dwellers and a Yoki. The area you are moving through is located near the Shrine from the starting point of the mission. Once you neutralize the source of the fog, you should return to the Shrine and regenerate yourself.

Further road leads down the corridor that you can see on the above picture. However, you should search all the scaffoldings as there is Kodama hidden on one of them. What's more, if you jump from the scaffolding shown on the picture at right time, you can enter a secret area behind the second Shrine. There you will find a hot spring and a Kodama.
Get to the bottom floor

You will notice a few ladders after reaching the lower floor. First use the ladder that is leading up. You will be attacked by a Yoki and a dweller will be throwing bombs at you from the neighboring scaffolding.
Notice the above picture. At the end of the corridor on the right you will find a door [1]. Previously it was locked when you attempted to open it from the other side. Remain up and go to the place marked on the picture [3]. You should unlock one of the ladders on the left on your way. Later this will allow you to use it. Under the chest [2] there is another Kodama hiding. After you send him to the shrine and try moving forward, bats will throw you down. Explore the area behind the mentioned corridor and keep going down. What's interesting, if you jump from the scaffolding in a carefully selected point [4], you will reach the scaffolding below. Another Kodama is hiding there. You should do it after all nearby opponents are eliminated.

Finally, you must jump down the scaffolding. There is a monk hiding in the fog. Use the machine and destroy the stone next to it after you kill the monk. A Yoki and a few dwellers are walking nearby.

Open the area below. The door shown on the picture is locked, but next to it you will find Kodama. On the right there is a corridor guarded by a dweller. At its end you will find a key to the door. Behind the door there is another Shrine.
Open the shortcut
After leaving the safe area you will be immediately attacked by a Monk. Lure him near the shrine so that you won't fall from the scaffolding during his charge. Then go immediately to the lower floor. Don't use the ladder since a poison fog is spread near the machine. On the lower floor you will encounter a few Yoki and a few dwellers.
![In this chamber there are two rocks that generate the poisonous fog - you can find them on both sides of the pillar [1] shown on the above picture - The Silver Mine Writhes | Main missions | NiOh - Main missions - NiOh Game Guide](/nioh/gfx/word/430874437.jpg)
In this chamber there are two rocks that generate the poisonous fog - you can find them on both sides of the pillar [1] shown on the above picture. Your main task is to open the door on the left. You can also find two Kodamas in this area. You should search all of the lower tunnels as you can find a few useful things there.

The first spirit is hidden on the ledge shown on the picture. Go from the Shrine towards the pillar shown on the previous picture. Turn right and go across the scaffolding until you reach the ladder. There will be a dweller on the left. Jump to the lower scaffolding on the right and enter the small corner. There you will find the Kodama. If you weren't already on the lowest point of this part of the level, then underneath you will see a Yoki. You must enter the corridor marked on the picture. There you will find a ladder that will lead you to the unavailable level of this part of the location.

Once you get up, keep going to the right. Halfway the scaffolding you can raise your guard as a monk will fall at you from the chests at the end of the alley. In the place from which he come you will find Kodama seen on the picture. Go to the left and then straight. You will reach a door that must be opened.
The corridor you have seen from the right is empty. At its end you will find the arena on which you will fight the boss. Your enemy will be Great Centipede. Advice related to fighting him can be found in separate chapter of the guide.
You are not permitted to copy any image, text or info from this page. This site is not associated with and/or endorsed by the Tecmo or Team Ninja. All logos and images are copyrighted by their respective owners.
Copyright © 2000 - 2025 Webedia Polska SA for gamepressure.com, unofficial game guides, walkthroughs, secrets, game tips, maps & strategies for top games.
