Fallout 3 Operation Anchorage: Paving the Way - part 1
Received from: automatically upon completion of The Guns of Anchorage [U.S. Army Field Headquarters]
Solution: This quest will begin inside the Command Tent. Listen to what General Chase has to say to you [#53]. It doesn't really matter whether you play by the rules or try to convince him that it's only a simulation, because you won't receive any additional rewards nor penalties. Instead Chase will inform that you'll have to destroy three targets and that you'll take command of your very own team. Once the initial conversation has ended approach the large table and allow him to continue with the briefing [#54]. It turns out that two of the targets are accessible right now and you'll have to secure them before going after the last objective.
![[#53] - QUEST 3: Paving the Way - part 1 - Simulation - Fallout 3: Operation Anchorage - Game Guide and Walkthrough](/fallout3operationanchorage/gfx/word/574388968.jpg)
[#53]
Once the briefing has ended, you'll be send over to talk to Lieutenant Morgan who should be sitting next to one of the computers [#54]. Notice that at the beginning of this new conversation you've been given five recruitment markers and two explosive charges. You should also know that you can ask Morgan about a lot of things, including choosing the best equipment and your teammates. Sadly you can't convince him that you would be capable of dealing with enemy forces alone. Don't forget to ask him about the importance and usage of recruitment markers he gave you. He'll tell you that your team can have up to three squad members. Finish the conversation by asking him a few questions concerning your three main objectives. It's not a requirement, but it's best to go in prepared and knowing what has to be done. Explore the tent once you've ended the conversation with him and you'll find psycho and a new holotape - I'm okay.
![[#54] - QUEST 3: Paving the Way - part 1 - Simulation - Fallout 3: Operation Anchorage - Game Guide and Walkthrough](/fallout3operationanchorage/gfx/word/574388984.jpg)
[#54]
COMPLETING THE TEAM:
Let's start out by saying a few things on how to complete the perfect team. In order to make the necessary changes you will have to use Patterson's terminal [#55]. Like I've mentioned before, your team can have up to three members, however each member takes a certain number of markers. Here are the exact values:
Infantryman - 1 marker
Grenadier - 1 marker
Bazooka soldier - 2 markers
Sniper - 2 markers
Mister Gutsy - 3 markers
Sentry bot - 4 markers
I would recommend that you stick with one of two choices. If you want your team to have as many members as possible, you should consider choosing a sniper, a bazooka soldier and an infantryman (2+2+1). If you're going for maximum firepower, choose a sentry bot and an infantryman (4+1). Thankfully you will be allowed to make changes during the course of this quest, because fallen allies will be replaced by new units and that's when you'll have a choice to take someone new. When you've made up your mind confirm the request and deploy your team outside the tent. You may close this window.
![[#55] - QUEST 3: Paving the Way - part 1 - Simulation - Fallout 3: Operation Anchorage - Game Guide and Walkthrough](/fallout3operationanchorage/gfx/word/574389000.jpg)
[#55]
CHOOSING EQUIPMENT:
In order to choose the best equipment you will have to use the left computer which is a Requisition Terminal (that's where Morgan was sitting) [#56]. You'll have to make up your mind on how you want to play the game. Here's the list of available equipment settings:
Fire team package - assault rifle x1, trench knife x1, frag grenade x12
Close assault package - power fist x1, 10mm pistol x1, combat shotgun x1, frag grenade x8, landmine x8
Sniper package - sniper rifle x1, 10mm pistol x1
Heavy weapons package - rocket launcher x1, 10mm submachine gun x1
If you plan on going to the chimera depot in the first place, you should use the sniper's package. If you want to visit the listening post, choose the heavy weapons package. Either way, you'll have to take a requisition hologram. You may exit the tent.
![[#56] - QUEST 3: Paving the Way - part 1 - Simulation - Fallout 3: Operation Anchorage - Game Guide and Walkthrough](/fallout3operationanchorage/gfx/word/574389015.jpg)
[#56]
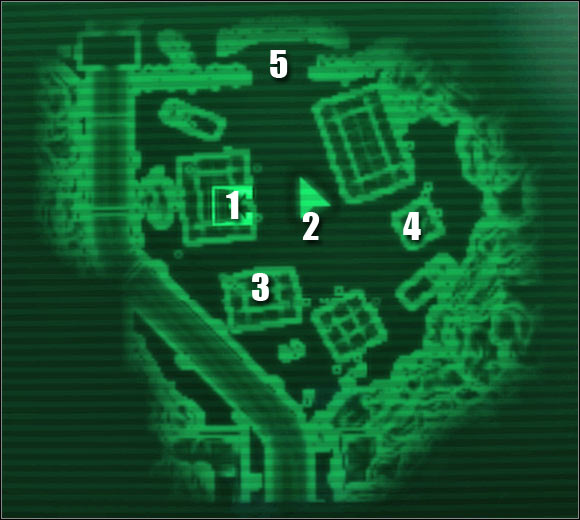
MAP OF THE FIELD HEADQUARTERS:

Map legend: 1 - command tent; 2 - area where your team members show up; 3 - Doctor Adami's tent; 4 - quartermaster's tent; 5 - main exit from the base
Once you've left the Command Tent you should head over and talk to Montgomery who will be standing next to your squad members. The main reason is that you will be allowed to issue orders to him that will affect the entire squad. The most important orders will concern moving towards designated areas of the map, however during the course of the quest you'll also want to ask him to replace fallen allies. You can show off by how intelligent you are during your conversation with Montgomery, however it won't do you any good. Instead order him to head on to the first location [#57]. If you plan on attacking the listening post, order him and other squad members to go to the mining town. If you want to attack the chimera depot, order him to wait for you near the ice camp. Thankfully you won't have to follow your teammates right away, because they'll wait for you when they reach their destination.
![[#57] - QUEST 3: Paving the Way - part 1 - Simulation - Fallout 3: Operation Anchorage - Game Guide and Walkthrough](/fallout3operationanchorage/gfx/word/574389046.jpg)
[#57]
Don't exit the allied base just yet. Instead proceed to the southern tent which is a some kind of a field hospital. Talk to Doctor Adami if you want to. She'll offer you free healing and you'll also receive five units of psycho. There's a health dispenser to your right if you need one [#58]. Leave the tent once you've healed yourself.
![[#58] - QUEST 3: Paving the Way - part 1 - Simulation - Fallout 3: Operation Anchorage - Game Guide and Walkthrough](/fallout3operationanchorage/gfx/word/574389062.jpg)
[#58]
There's only one more place for you to visit and that's the quartermaster's tent. Talk to the man. It's important that you win a speech challenge during the course of this conversation [#59], because the quartermaster will give you additional supplies. Notice that the Gauss rifle has been added to your inventory, along with eight microfusion cells. Don't forget to ask the quartermaster about your main package by giving him the holodisk received during your stay in the Command Tent. End the conversations and make sure that you've explored quartermaster's tent. There are both dispensers there, as well as standard supplies - mines, rockets, grenades and cells. You may finally proceed towards the main exit from the base.
![[#59] - QUEST 3: Paving the Way - part 1 - Simulation - Fallout 3: Operation Anchorage - Game Guide and Walkthrough](/fallout3operationanchorage/gfx/word/574411718.jpg)
[#59]
- Fallout 3: Operation Anchorage Game Guide
- Fallout 3 Operation Anchorage: Game Guide
- Fallout 3 Operation Anchorage: Simulation
- Fallout 3 Operation Anchorage: The Guns of Anchorage - part 1
- Fallout 3 Operation Anchorage: The Guns of Anchorage - part 2
- Fallout 3 Operation Anchorage: The Guns of Anchorage - part 3
- Fallout 3 Operation Anchorage: The Guns of Anchorage - part 4
- Fallout 3 Operation Anchorage: The Guns of Anchorage - part 5
- Fallout 3 Operation Anchorage: Paving the Way - part 1
- Fallout 3 Operation Anchorage: Paving the Way - part 2
- Fallout 3 Operation Anchorage: Paving the Way - part 3
- Fallout 3 Operation Anchorage: Paving the Way - part 4
- Fallout 3 Operation Anchorage: Operation Anchorage - part 1
- Fallout 3 Operation Anchorage: Operation Anchorage - part 2
- Fallout 3 Operation Anchorage: Operation Anchorage - part 3
- Fallout 3 Operation Anchorage: Simulation
- Fallout 3 Operation Anchorage: Game Guide
You are not permitted to copy any image, text or info from this page. This site is not associated with and/or endorsed by the developers and the publishers. All logos and images are copyrighted by their respective owners.
Copyright © 2000 - 2026 Webedia Polska SA for gamepressure.com, unofficial game guides, walkthroughs, secrets, game tips, maps & strategies for top games.
