The interface
Last update:
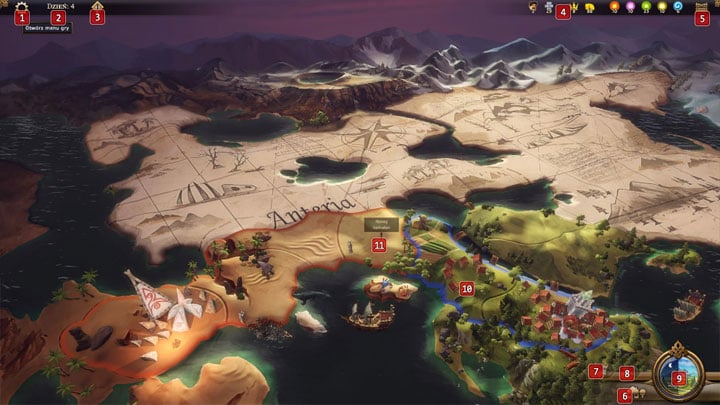
Champions of Anteria will require you to undertake action both in the tactical view and in the adventure mode. These two are considerably different from each other and they require different management. On the world map, you can conquer enemy territories and defend your lands, while developing your village. The adventure mode starts when a group of heroes is dispatched on a mission . Each of the views has its own interface and its own functions, whose descriptions have been provided below.
World map

1 - Game menu
Opens the game menu, where you can select individual options or leave the game.
2 - Number of days
Shows how many days have elapsed since the beginning of the game. Clicking the counter accesses your log, where you learn, e.g. about your income from resources in specific days and how much land you own.
3 - Faction level
Displays the level of your faction. Faction level increases with renown that you spend on the skills tree. At the same time, this specifies experience level of your heroes.
4 - Available resources
Displays which resources you own and, after you roll the mouse over a specific icon, it specifies the rate of their inflow. In the game, there are the following resources present: peasant (number of residents), building materials, renown, gold, materials: fire, metal, nature, lightning and water.
5 - Inventory
Accesses your heroes' inventory screen.
6 - Village view
Access the village management screen.
7 - Trading factories and fortifications
Accesses trade factory and fortifications management screen
8 - Demolish trade factories/fortifications
Destroys trade factories and fortifications.
9 - End turn
Ends the current turn and starts the next one.
10 - Your lands
Your lands appear outlined in blue and they generate additional resources.
11 - Enemy territory
These are territories that you can conquer for additional bonuses. After you click on a given area, the game presents you with a short description of the mission and specifies rewards for completing that mission.
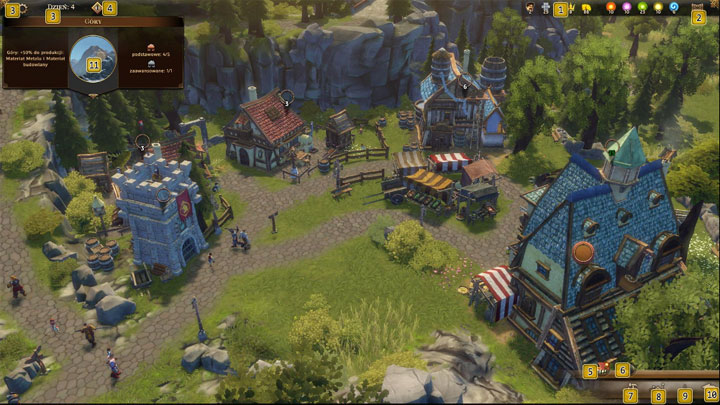
The village

1 - Available resources
Displays which resources you own and, after you roll the mouse over a specific icon, it specifies the rate of their inflow.
2 - Inventory
Accesses your heroes' inventory screen.
3 - Game options
Displays game options
4 - Number of days and faction level
Displays the number of days elapsed since the beginning of the game. After you click on it, it access your log.
It specifies experience level of your faction and your heroes.
5 - Construction panel
Accesses the construction panel, where you can select buildings to be erected in the city. Available buildings: general, building materials manufacturers and ones that generate materials: fire, nature, lightning and water. After you select the building, you will be presented with slots where you can build them.
6 - Demolish buildings
Thanks to this, you can select buildings for demolition. This lets you free some space to build other buildings.
7 - Crafting panel
Here, you can order the construction of new devices and gear for your heroes.
8 - Technology screen
Displays technologies available for development thanks to which you gain access to more buildings and skills.
9 - Hero panel
Here, you can view the available heroes and train them.
10 - Back
Returns you to the world map
11 - Information on an area or building
It displays supplementary information on a given sector or building. Here, you can look up what a given region specializes in, how much resources it generates and how many buildings can be erected there.
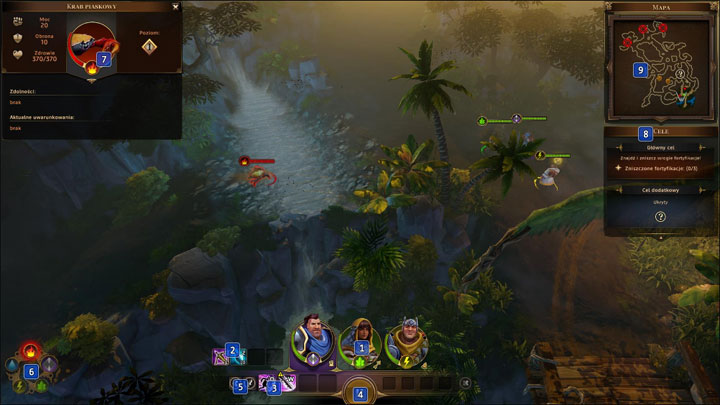
Adventure mode

1 - Heroes
After you select it, it allows you to select a hero. By rolling the mouse over the icon of the character, you receive additional information about the specific unit, health, power, defense and the element wielded.
2 - Quick access bar
Here, you can select items and use them to make it easier to complete the mission. The key items are, e.g. health potions.
3 - Ability screen
It displays abilities of a given character and allows you to use them.
4 - Pause
You can also press the space bar to activate pause. It pauses the game and allows you to plan on your actions.
5 - Attach/march
After you select it, you give an order to a given character to attack a specific target or go into specific area.
6 - Wheel of elements
After you select given unit, it shows you the element that the unit wields. Apart from that, it depicts the correlation between individual elements.
7 - Character screen
Provides information about the selected character.
8 - Mission objectives
Displays objectives necessary to complete to complete the mission. Apart from the main ones, it also presents side and hidden tasks.
9 - Area map
Presents map of the specific location, where markers specify locations of objectives, opponents and your heroes.
You are not permitted to copy any image, text or info from this page. This site is not associated with and/or endorsed by the Ubisoft or Blue Byte Software. All logos and images are copyrighted by their respective owners.
Copyright © 2000 - 2025 Webedia Polska SA for gamepressure.com, unofficial game guides, walkthroughs, secrets, game tips, maps & strategies for top games.
