Palworld - Server Settings Explained
There is a possibility to enable your private server in Palworld, yet it requires additional configuration. Here you will find the most important settings explained.

Saying that Palworld took Steam by storm would be an understatement. Even though the game just entered early access stage, it already jumped into the first place on Steam, when it comes to the number of concurrent players. A peculiar mix of Pokemons with guns allows for an online play, but if you would like to enjoy it in more private environment, or on your own rules, the situation is a bit more complicated. We’ll have to delve into yet untamed territory of server settings and go through rudimentary files to have everything configured.
Server settings in Palworld
It is worth reiterating that Palworld is in Early Access. Due to that, it is expected that some of the functionalities are still in rather primitive state. Such is the case with custom servers and their settings. It is great that on the launch day we are already able to use such a feature, though it requires more work to get it running.
There is already an extensive guide created by the developers themselves on how to get the server up and running, yet some of its configuration remains unclear. To implement your own settings, you have to copy all the text from one configuration file:
- main_game_folder\PalServer\DefaultPalWorldSettings.ini
to another:
- main_game_folder\PalServer\Pal\Saved\Config\WindowsServer\PalWorldSettings.ini
To find the main game folder, go to your Steam Library, right click on Palworld, then select Manage option and click on “Browse local files”. This will take you to the desired location in C:\Program Files (x86)\Steam\stamapps\common\Palworld by default, yet it can differ depending on where you have set your steam’s storage directory.
There is a lot of settings though that you can miss if you just copy it without changes, so let’s dive deeper into the most important ones and what they can modify on your server:
- ServerPlayerMaxNum – Changes the overall number of players allowed on your server.
- ServerName – Modifies the name of the server (make sure that the name is in quotation marks).
- SeverDescription – Sets the description of your server.
- AdminPassword – Determines the administrator password that allows server control.
- ServerPassword – Specifies password that allows only people knowing it to join.
- PublicPort – By default 8211, but if you know what you are doing, you can change it. If you want your server to be available over the internet, make sure that this port is correctly forwarded, and the following setting is also correctly set.
- PublicIP – Setting for specific your public IP address, which would allow people to join your server.
- RCONEnabled – By default set to False, but you can set it to true if you intent to use Remote Console access to your server.
- RCONPort – Preset to 25575; specifies the port for Remote Console, if you want to use it.
- Region – Sets the region of your server.
- bUseAuth – Enabled by default, determines if your Palworld server will use authentication.
- BanListURL – points to txt file with ban accounts; default URL is set to https://api.palworldgame.com/api/banlist.txt
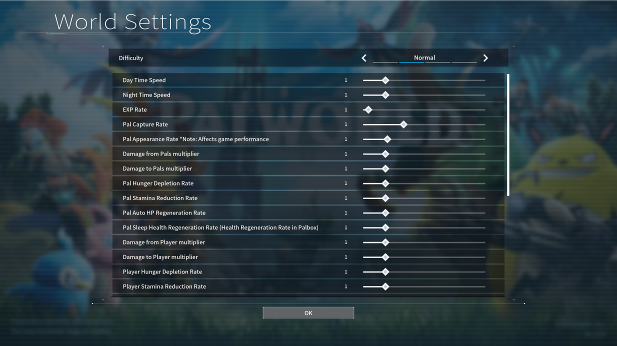
There are also a lot of other game related settings, that are quite self-explanatory and can be found inside the game’s World Settings menu:

Feel free to adjust them to your heart’s content in the PalWorldSettings.ini config file. Make sure to restart your server each time you change the settings so they can be applied. Have fun!
Palworld Interactive Map
We have prepared an interactive map with pals, important places and more. The work is in progress but we will update it shortly.
If you would like to know more about Palworld, check also:
- OCE Servers in Palworld Explained
- Palworld - Developers Try to Fix Server Connection Issues
- Audio Issues in Palworld, Problems with Compressed Sound Explained
1

Author: Aleksander Kartasinski
Just a random from the depths of the internet who happens to be interested in video games like millions of other people on this planet. By sheer luck he was given a chance to write about them. Worked in IT department and supported users for way too long, but also given a chance to do some IT magic on a large scale in his free time. Interested in technology, games with intriguing mechanics, etymology, and linguistics.
Latest News
- Ellie from The Last of Us inspired the creature in Bruce Straley's new game
- Larian Studios CEO explains generative AI use in development of Divinity
- Kojima Productions celebrates its big 10th anniversary with an upgraded Ludens
- They didn't conquer TGA, but they were still very successful. Now they are thanking the fans in the best possible way
- Pawel Sasko revealed his favorite Cyberpunk 2077 ending and explained what CD Projekt Red wanted to say to players through the saddest one


