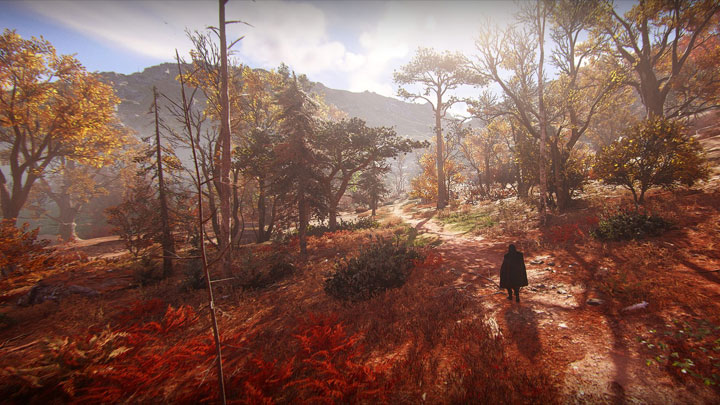
Project Valkyrie Visual Overhaul Collection - Enhanced Graphics with Cinematic Effects Using ReShade to is a modfor Assassin’s Creed: Valhalla, created by TheMercsAssassin.
Description:
roject Valkyrie is a steadily expanding set of ReShades that enhances Assassin's Creed Valhalla's already good visuals with, depending on which ReShade preset you use, more vivid, realistic, or cinematic looks. Each preset also adds tons of optional, fine-tuned cinematic effects, including film-grade depth-of-field, film grain, letterboxing (black bars), chromatic aberration and anamorphic lens distortion (to simulate a camera lens), and enhanced bloom and lens dirt.
Four (4) ReShade presets are bundled in at launch. You'll be able to pick from one very gritty, Dark-Souls-3-inspired preset, one natural-toned preset, with vividness closer to the vanilla game but color balanced, and one vivid preset with stunning (yet balanced) colors. An additional preset is included which is quite close to the vanilla color scheme with simply less washed out colors and lighting and only slight color grading.
I'll be adding many more throughout the game's life-cycle. Each preset color corrects the game's sometimes green or purple tint.
HOTKEYS:
All of these are remappable once in game. (make sure numberpad is enabled or the controls won't work).
-Toggle ReShade menu on-off - HOME
-Toggle all ReShade effects - must be set in the ReShade setting's menu, I like to use END personally
-Toggle depth-of-field - / on numberpad
-Toggle lenz distortion (warping in corners of screen) & chromatic aberration (color bleeding on objects' edges toward the edges of the screen) - 2 on numberpad
-Toggle sharpness - 5 on numberpad
-Toggle film grain - 3 on numberpad
-Letterbox ("The Black Bars") - 0 on numberpad
-Bloom and lens effects - 6 on numberpad (off by default)
-Alt Bloom, mostly for torch and sun in specific circumstance - 7 on numberpad
-Vignette (darkness around the corners, should definitely cut this off is you cut letterbox off) - * on numberpad
INSTALL INSTRUCTIONS:
1. Download ReShade 4.7.0 from here:
2. Run the ReShade .exe and choose your ACValhalla.exe.
3. Select the DirectX 10/11/12 for the API
4. Under "select effect packages to install", keep the two default boxes checked ("standard effects" and "sweetFX"). Click continue and uncheck all for first set of effects and hit continue. Uncheck all for the next set of effects as well then recheck "Border". Continue until you the pop up window closes and tells you ReShade was installed successfully (BUT WE ARE NOT QUITE DONE YET).
5. Now download the main file .zip file from here on Nexus. Open the zip file.
6. Copy and paste the files and folder into your AC Valhalla main folder where your game's ACValhalla.exe is. Overwrite anything it ask, if it asks, (don't worry, you're just overwriting ReShade files, not your game files).
7. Launch the game. Don't press anything until the game loads up pass the splash screen, you should see the ReShade notification in the top-left of the screen in a big grey box telling it's loading its effects. If you click anywhere on your desktop as the game is initially loading, it'll likely open in a non-borderless window, which you don't want. If this happens just close the game and relaunch it.
8. Open ReShade menu with "Home" and select skip the ReShade tutorial, then use the drop down menu to select the preset you wish to use.
I strongly suggest you go the ReShade's "settings" tab and set a toggle key for the ReShade itself so you can turn it on and off easily when going into the gear menu. I use the "END" key for my toggle key, personally.
To install the optional files, be sure you've installed the main files first and then just repeat step 5 to install the optional presets. Choose the optional presets from the in-game menu after installing them (installing the optional files can be done while the game is running as long as ReShade is already installed properly. Just hit the "Reload" button at the bottom of the ReShade menu).
You can also set up a toggle for screenshots here, I set mine to F11, personally. Screenshots will default to you game's folder by default but you can change the destination in the settings menu as well.
9. Profit?
CRASHING FIXES & FAQ:
1. For me, all games used to crash if I use any form of ReShade or SweetFx in fullscreen mode. So you could try to enable borderless window mode to use ReShade if your game crashes when trying to load the game while in fullscreen mode with Reshade enabled.
2. I used to need to rename my reshade file "dxgi.dll" to "d3d11.dll" to get the game to stop crashing on launch.
3. Disable the Uplay Overlay if crashing continues.
4. I've tested and optimized this ReShade for the game's default in-game brightness. Tested on a mix of high and ultra settings.
5. Toggle depth-of-field - / on numberpad
UNINSTALLING:
1. Delete the "reshade-shaders" folder, "ReShade.ini" file, "d3d11.dll", and "d3d11.log" file from your game folder. That's it.
- Last update: Tuesday, November 17, 2020
- Genre: Action
- File size: 25.4 MB


